
Paypal Adavnced Payment plugin
PayPal Payments Advanced is a PCI-compliant solution. Even customers without a PayPal account can make purchases through PayPal’s secure payment gateway using the credit card. Accepted cards include Visa, MasterCard, Switch/Maestro, and Solo credit cards in the United States.
PayPal Payments Advanced is available only for merchants in US and Canada.
Requirements
PHP 5.3 or higher
Joomla 2.5.x
J2Store 2.0.2 or above
Installation Instructions
Use the Joomla installer to install the plugin like you do for other extensions
Configuration
Step 1: Configure Your PayPal Account Before you begin, you must configure your PayPal Payments Advanced account on the PayPal website.
Log in to your PayPal Advanced account at click here
Go to Service Settings -> Hosted Checkout Pages -> Set Up, and make the following settings:
1 - Set Transaction Process mode to TEST or LIVE depending on your requirement.

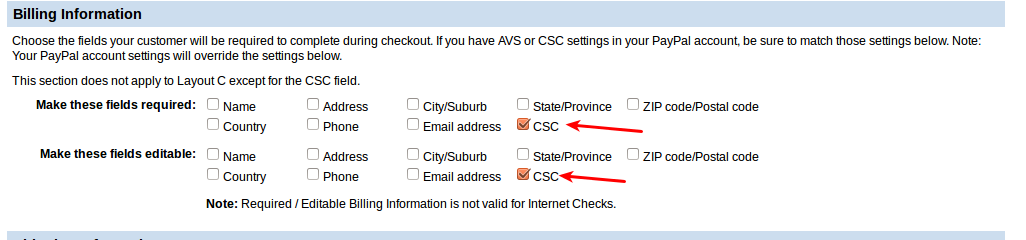
2 - Under the Billing Information
Make these fields required: Check CSC box
Make these fields editable: Check CSC box
See the picture below
3 - Under the Payment Confirmation, set Show confirmation page: On my website
Return URL Method: POST (This is very IMPORTANT)

4 - Under Security options, set
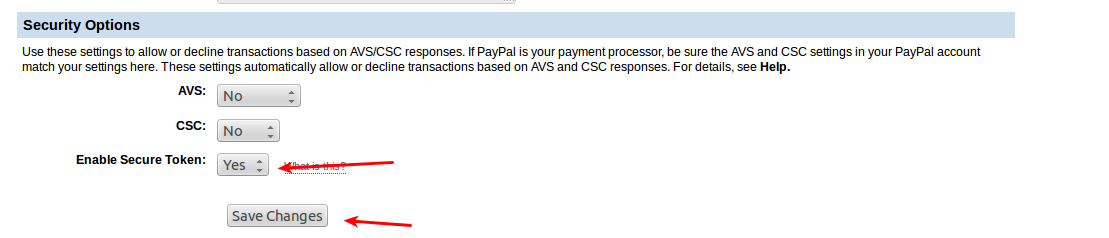
• AVS: No• CSC: No• Enable Secure Token: Yes
Save the settings.
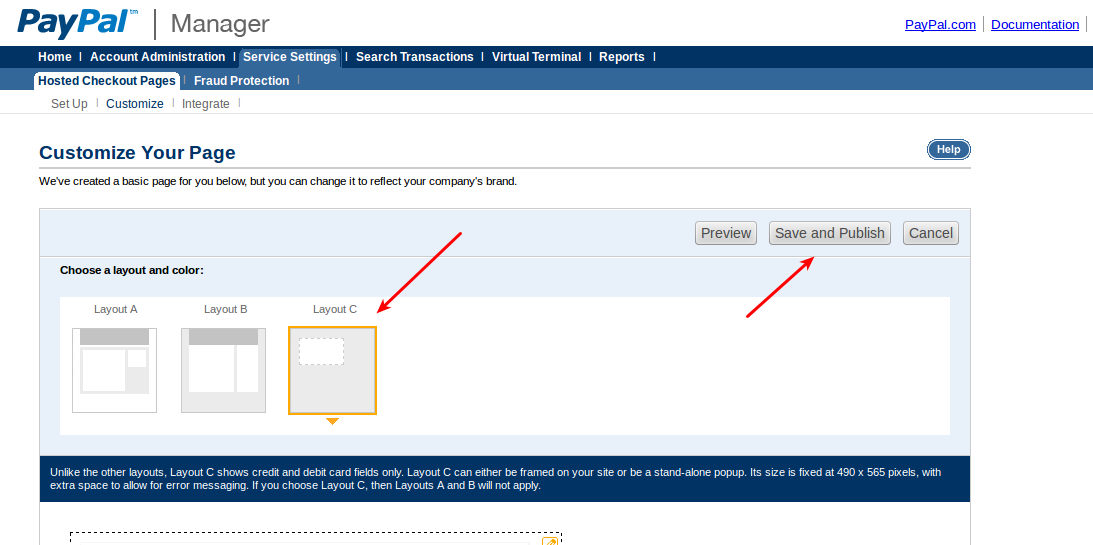
Step 2: Customise the Layout In J2Store Paypal advanced plugin settings, you can choose the Payment window type. If you chose, Payment window type as: Your Website (Using iFrame): In Paypal manager, go to Service Settings > Hosted Checkout Pages> Customize. Choose the Layout C.
See the screenshot below
If you chose, payment window type as Redirect :
In Paypal manager, go to Service Settings > Hosted Checkout Pages> Customize. Choose the Layout B
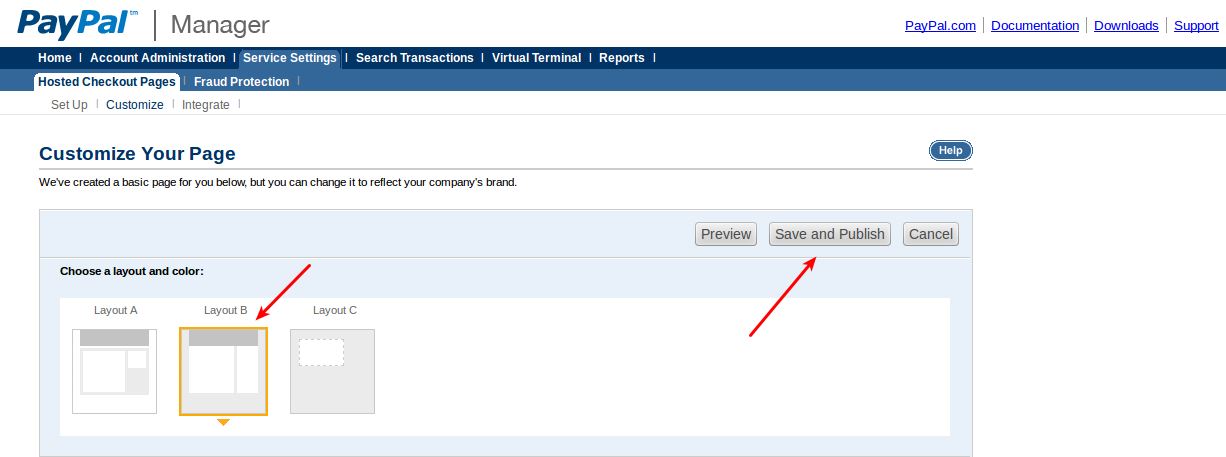
Click Save and publish.
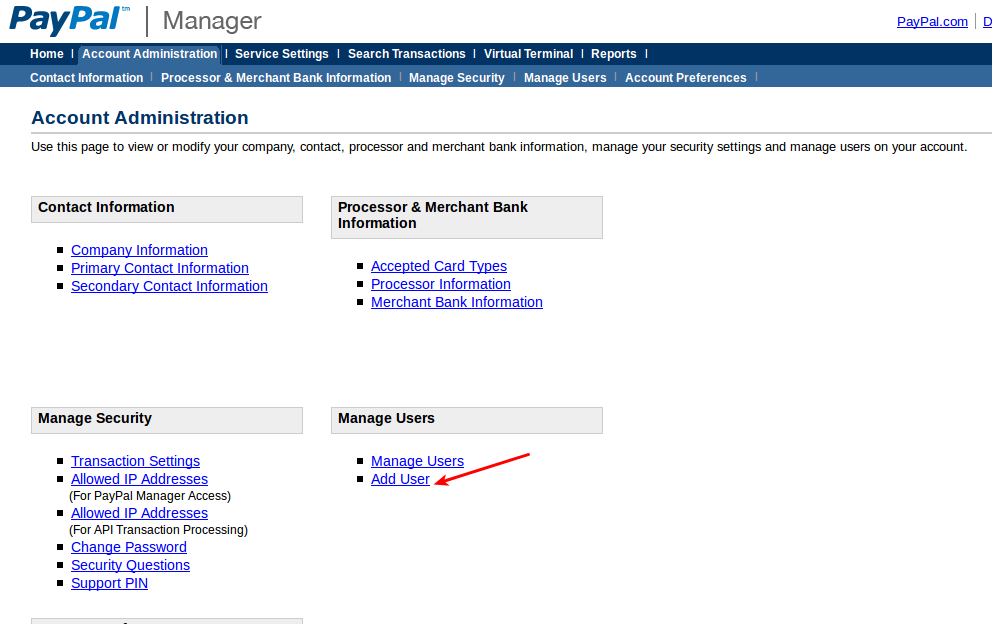
Step 3 (Optional): Create a user PayPal recommends that you set up an additional user on your account. To set up an additional user, do the following:
Go to manager.paypal.com and log in to your account.
Follow the instructions to set up an additional user.
set “Select a Predefined Role:” as “FULL_TRANSACTIONS”
Save the changes.
Configuring the Plugin Go to Joomla admin → Extensions → Plugin Manager → Paypal Payments Advanced plugin.
Payment option title The value entered here will be used as the title for this payment method. Customer will see this value when he checks out. Default: Paypal Payments Advanced
Vendor/Merchant Login: The Merchant Login with which you login to Paypal Manager.
User: Your User ID. If you created a new user, then enter that user id here. If not, then this field should carry the same value as the Vendor/Merchant Login.
Password: Your password with which you login to Paypal manager.
Partner: Your PayPal partner ID. By default, it will be PayPal.
Transaction Type: The type of transaction. If you choose SALE, then the payment will be captured immediately after a customer makes the payment. If you choose Authorization, then Payment will not be captured. You will have to capture it manually by going to Paypal Manager. Default value: Sale
Test mode: Set this to YES, only if you have set the Transaction Process Mode to TEST in the Service Settings->Hosted Checkout pages → Set up.
IN LIVE SITE, THIS SHOULD BE SET TO NO.
Article ID for Thank You message: You can create an article to say thanks, provide some information or instructions to the customers, who purchased in your online store. Enter the Article ID here. This will show,when customers return from the paypal.
Display text on selection The text entered here will be displayed when customer selects this payment method.
You can enter a language constant as a value here if you are using a multi-lingual site and then write a language override. Refer the tips below
Tip - ONLY FOR MULTI-LINGUAL SITES
For example, enter a language constant:
J2STORETEXTTODISPLAYON_SELECTION. Now you can go to Joomla admin-> Language Manager->Overrides and create overrides for the language constant in all your languages.
Display text before payment The text entered here will be displayed to the customer at the order summary screen before he makes the payment. You can enter a language constant as a value here if you are using a multi-lingual site and then write a language override. Refer the Display text on selection parameter.
Display text after payment/order The text entered here will be displayed to the customer after he makes the payment. You can enter a language constant as a value here if you are using a multi-lingual site and then write a language override. Refer the Display text on selection parameter.
Display text on error in payment The text entered here will be displayed to the customer when there is an error in the payment process. You can enter a language constant as a value here if you are using a multi-lingual site and then write a language override. Refer the Display text on selection parameter.
Display text on cancel payment The text entered here will be displayed to the customer when he cancels the payment at the gateway (NOT in your site). You can enter a language constant as a value here if you are using a multi-lingual site and then write a language override. Refer the Display text on selection parameter.
Payment Button Text The text of the payment button. The button will be displayed at the final checkout step Testing the plugin When you first start testing you will most likely keep getting response code 126 (at least if you’re testing with a credit card) meaning your transaction triggered a fraud filter.
This will cause orders to be saved in J2Store as FAILED. This happens because PayPal Manager has AVS fraud protection turned on by default and it will always fail since you’re using test credit card numbers. If you want to pass the AVS check and see orders saving as Approved / Confirmed in J2Store, you’ll have to temporarily disable AVS fraud filters. To do that click on Service Settings inside your PayPal Manager account. Then click Fraud Protection. When the page load, click on Test Setup. Go to Edit Standard Filters. Uncheck all the checkboxes and hit Deploy at the bottom.
Testing with a credit card Follow these guidelines for testing:
While testing, use only the credit card numbers for testing. Other numbers produce an error.
Expiration date must be a valid date in the future.
If you’re getting an authorization error in test mode, try lowering the charge amount.
Test Card Numbers American Express 378282246310005 American Express 371449635398431 American Express Corporate 378734493671000 Diners Club 38520000023237 Discover 6011111111111117 Discover 6011000990139424 JCB3530111333300000 JCB3566002020360505 MasterCard 5555555555554444 MasterCard 5105105105105100 Visa 4111111111111111 Visa 4012888888881881
Support Still have questions? You can post your questions in our support forum: click here
Thank you for using our extension.
Last updated