
Moneris eselectplus Hosted Paypage
The plugin integrates the eSELECT Plus Hosted Paypage method of Moneris Payment gateway with J2Store.
Installation
Use the Joomla extensions installer to install the plugin.
Configuration
Moneris account
You need to set up your Moneris eSELECT Plus Hosted Paypage.The following configuration steps are required under your Moneris eSELECT Plus merchant account. Please ensure you have your merchant account set up on moneris before continuing.
Step 1 : Log into the Merchant Resource Center
Production :https://www3.moneris.com/mpg” target=“_blank”rel=“noopener”> click here
Before you can send a transaction to the Hosted Paypage you will need to configure several settings through the eSELECTplus Merchant Resource Centre (MRC).
For test accounts
To log into the MRC test environment go tohttps://esqa.moneris.com/mpg” target=“_blank”rel= “noopener”> click here and use one of the following login Ids.
Store ID UserName Password
Store 1 demouser password Store 2 demouser password Store 3 demouser password
Step 2: Navigate to Admin -> Hosted Config Once you have successfully logged in, click on the “ADMIN” menu item on the left and then in the submenu that appears click on “HOSTED CONFIG”.
Step 3: Create Hosted Paypage configuration:
To create a new Hosted Paypage configuration, click on “Generate a New Configuration”.
 You will be assigned a Hosted Paypage ID (psstoreid ).
This is the identifier for this unique configuration. You will also be assigned a Hosted Paypage Key (hppkey). Note down the psstoreid (hppid for US) and hpp_key . You will need these while setting up the plugin.
Step 3.1: Set Transaction Type to Purchase (default).
Step 3.2: Under Payment Methods, ensure Credit Cards is enabled, all others disabled.
Step 4: Response Method
Set Response Method to Sent to your server as a POST.
Set Approved URL and Declined URL to:
https://YOUR_HOST/index.php?option=com_j2store&view=checkout&task=confirmPayment&orderpayment_type=payment_moneris&paction=process See the screenshot below
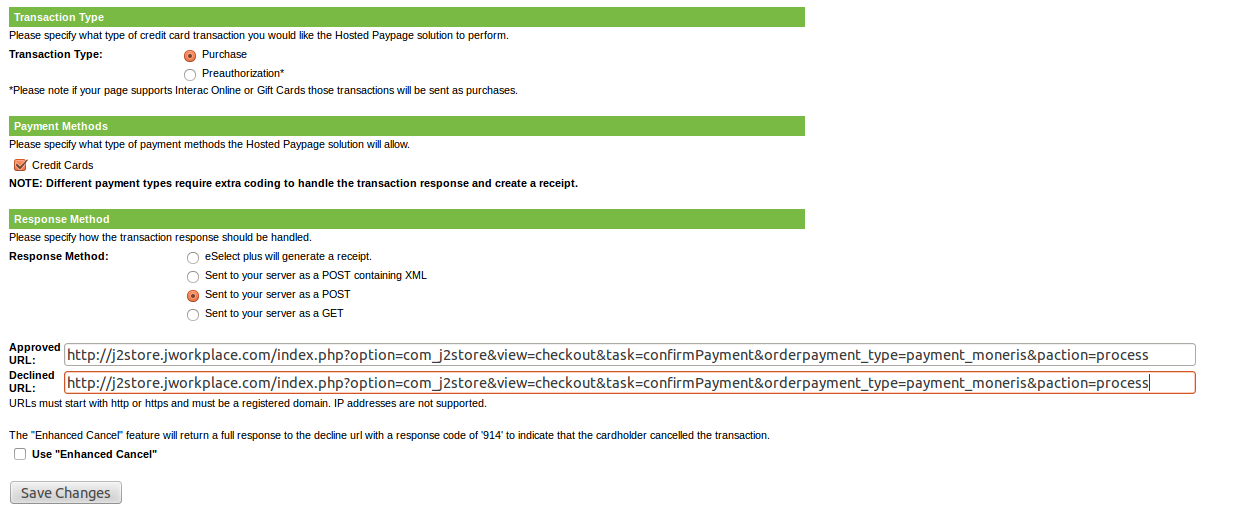
Step 4.1: Choose “Use Enhanced Cancel”if you want to return a full response to decline url. Click the Save Changes button.
Step 5: Configure Response Fields
Click on the Configure Response Fields button.Enable Return the txn_number.
This field is used to perform follow-ons and leave all others disabled.
Click Save Response settings.
Then Click the Return to Main Configuration.
Step 6: Configure Security
Click the Configure security button. In the Transaction Verification section, Enable Transaction Verification.
Set the Response Method to: Sent to your server as a POST
Enter the following url in the Response URL field:
https://YOUR_DOMAIN/index.php?option=com_j2store&view=checkout&task=confirmPayment&orderpayment_type=payment_moneris&paction=verify See the screenshot below
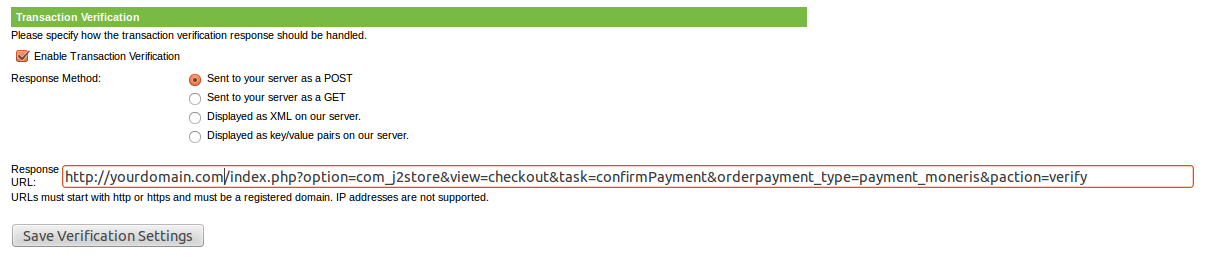
In the above image, click Save Verification Settings and then return to Main Configuration.

Set the cancel URL to

Plugin Configuration Go to Joomla admin → Plugin Manager and open the Moneris Payment plugin.
The plugin has following options:
Payment option title The value entered here will be used as the title for this payment method. Customer will see this value when he checks out.
PS Store ID The psstoreid generated in your merchant account in the previous steps.
HPP Key hpp_key generated in your merchant account in the previous steps.
Use Sandbox Set yes to test the integration of the plugin with the Moneris development server.
Article ID for Thanks Message
You can create a Joomla Article to say thanks to the users, who purchased in your online store. Enter the article ID here.
Display text on selection The text entered here will be displayed when customer selects this payment method. You can enter a language constant as a value here if you are using a multi-lingual site and then write a language override.
Refer the tips below
Tip - ONLY FOR MULTI-LINGUAL SITES
For example, enter a language constant:
J2STORETEXTTODISPLAYON_SELECTION.
Now you can go to Joomla admin-> Language Manager->Overrides and create overrides for the language constant in all your languages.
Display text before payment
The text entered here will be displayed to the customer at the order summary screen before he makes the payment. You can enter a language constant as a value here if you are using a multi-lingual site and then write a language override. Refer the Display text on selection parameter.
Display text after payment/order The text entered here will be displayed to the customer after he makes the payment. You can enter a language constant as a value here if you are using a multi-lingual site and then write a language override. Refer the Display text on selection parameter.
Display text on error in payment The text entered here will be displayed to the customer when there is an error in the payment process. You can enter a language constant as a value here if you are using a multi-lingual site and then write a language override. Refer the Display text on selection parameter.
Display text on cancel payment The text entered here will be displayed to the customer when he cancels the payment at the gateway (NOT in your site). You can enter a language constant as a value here if you are using a multi-lingual site and then write a language override. Refer the Display text on selection parameter.
Payment Button Text The text of the payment button. The button will be displayed at the final checkout step.
Support Still have questions? You can post in our supportforum: click here
Thank you for using our extension.
Last updated