
Downloadable product
Introduction
The product type allows you to sell digital products like PDF, images, audio, video, software, e-books etc.Customer will be able to download the file immediately after making the payment.
Product Settings
The settings in this type are almost identical to simple product except a very few.
Since this is downloadable, obviously it has no shipping option. Likewise, there is no options page also, to choose a color or size, because it has no physical existence.
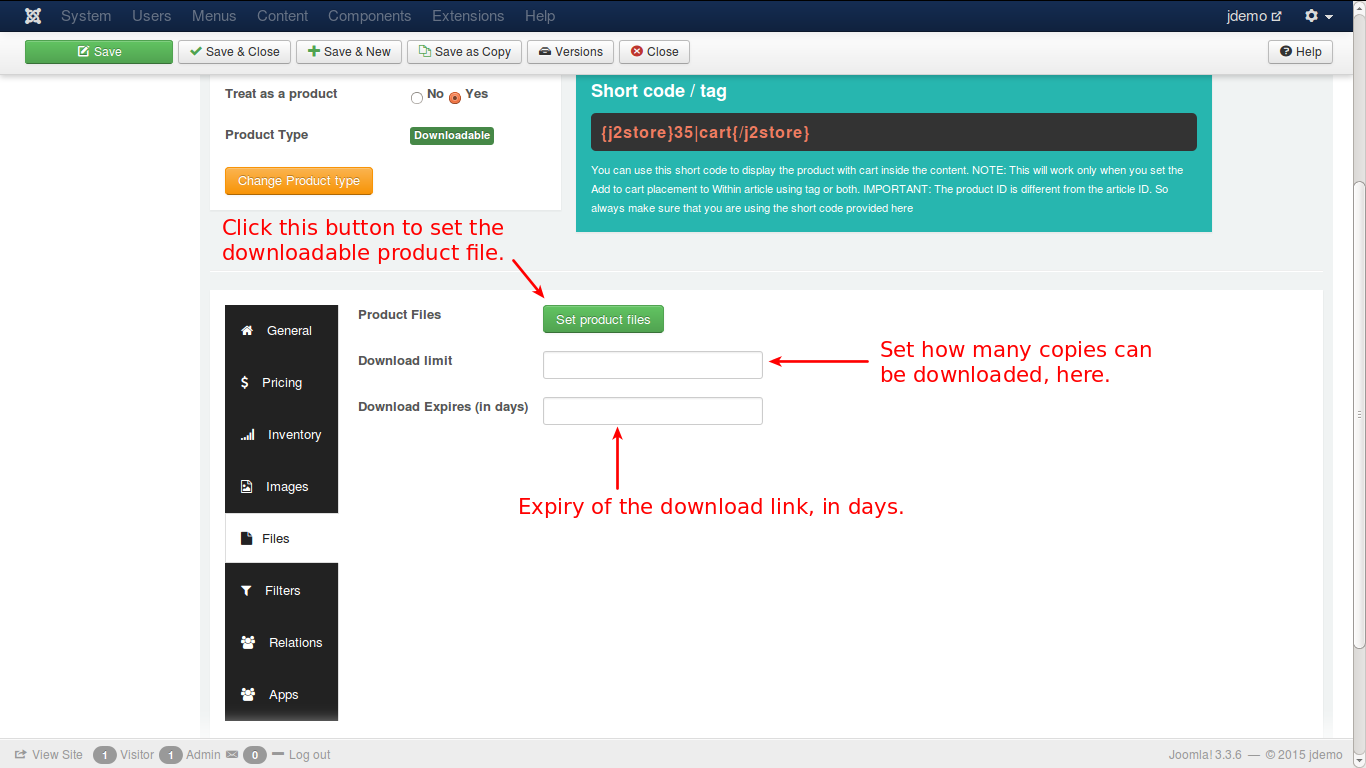
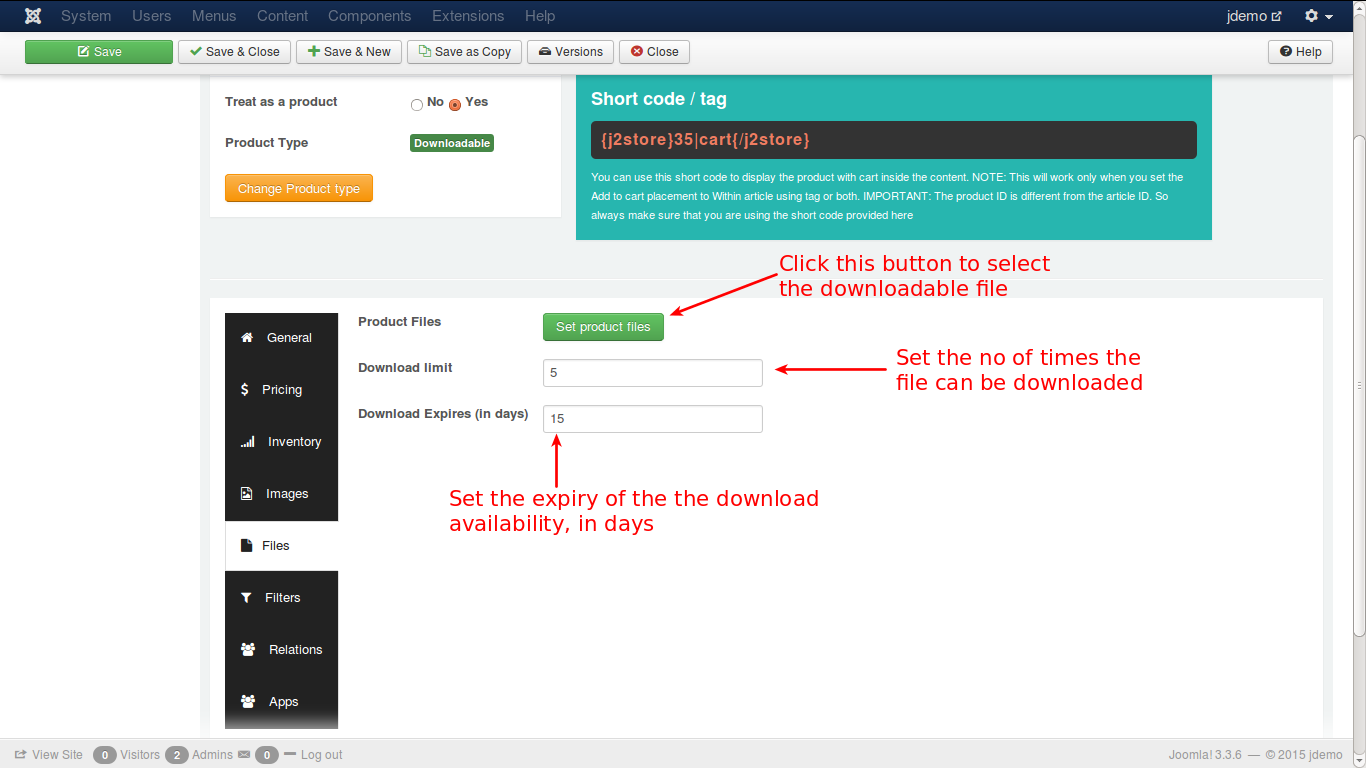
But there is unique option Files for this product type. Have a look over that option.
Files
There are three options here to set before further action.
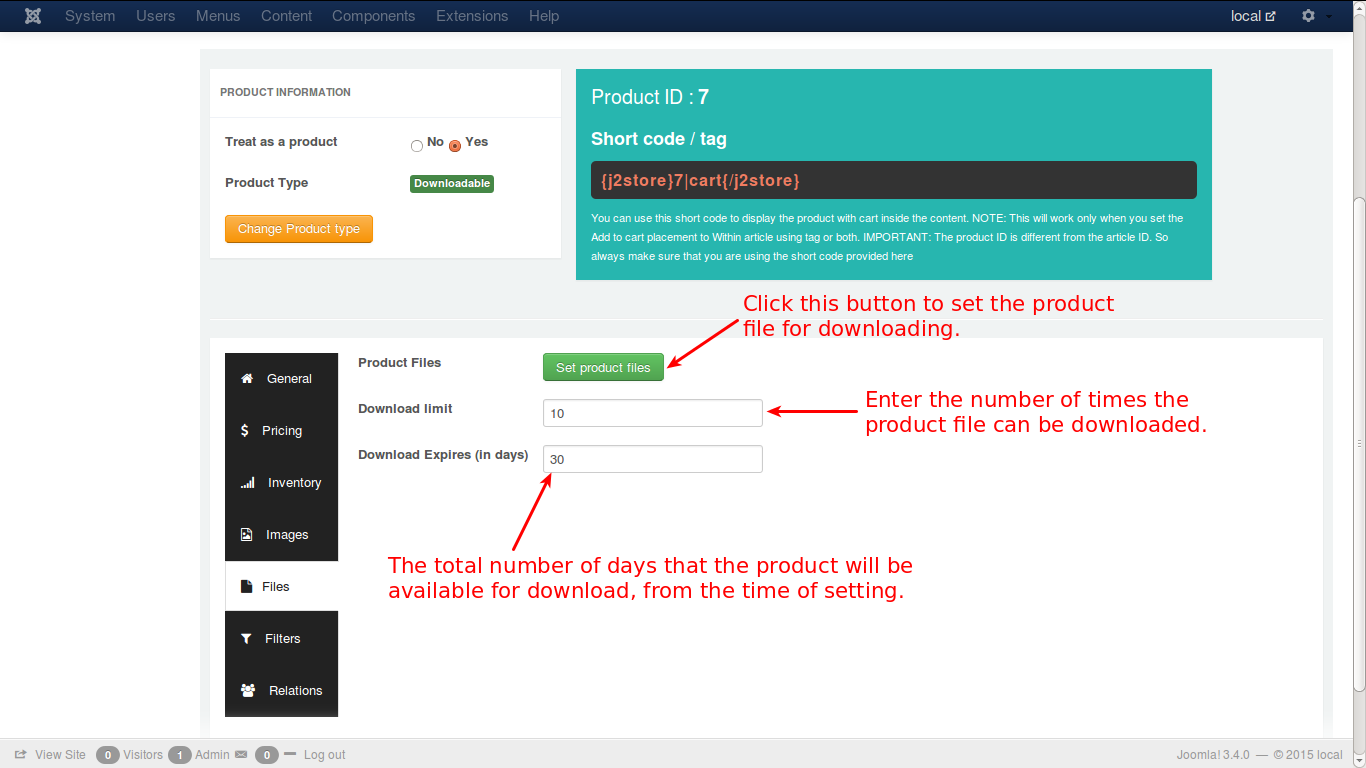
Product Files
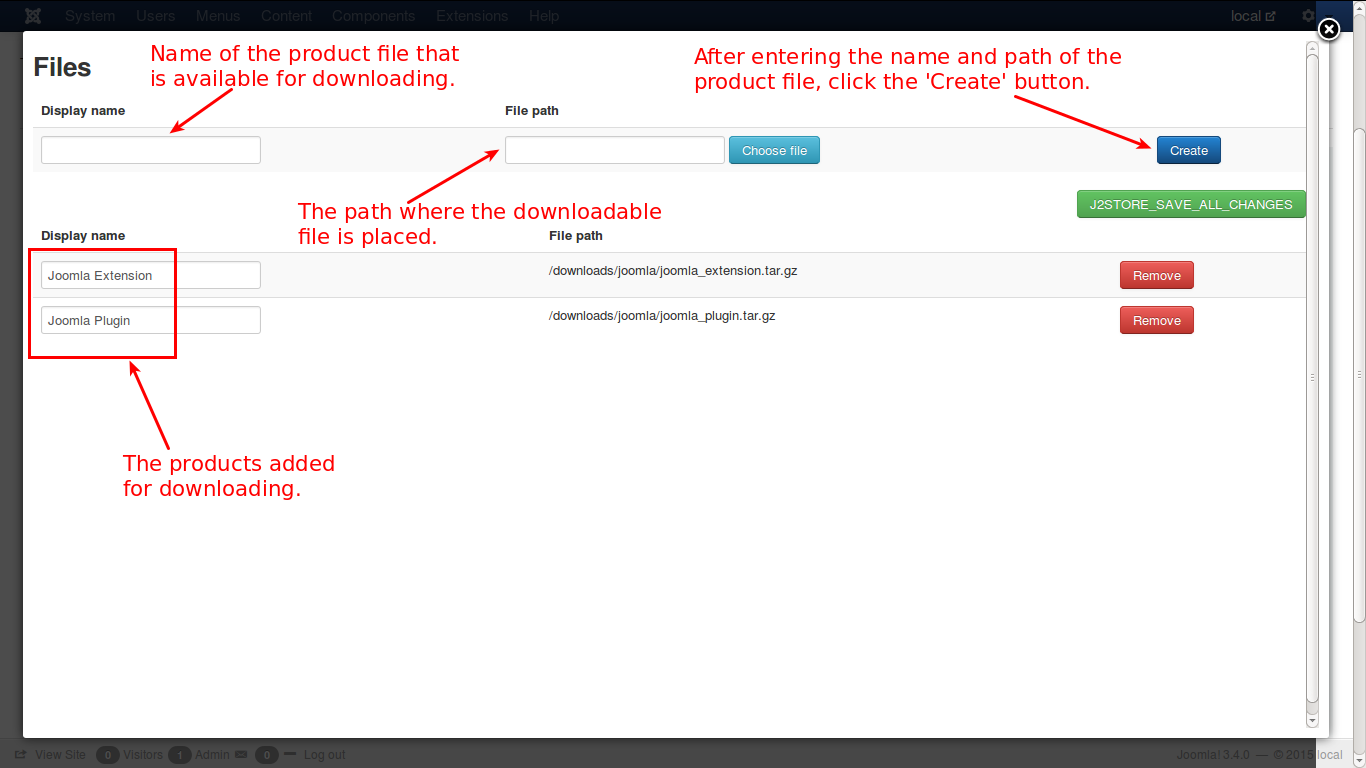
First there is a button to select the downloadable files to set for the customer to view. When clicked, it will direct to a popup window in which the display name and the path of the downloadable file are set.
VERY IMPORTANT: In configuration -> basic settings, the File attachment path field should point to an existing directory inside your website root.
If you specify a directory outside the public root, then you should enter the full file path manually.
** A file has to be associated to a downloadable product. If not, no downloadable link would appear at the My downloads section of the user’s My profile page even if user has bought the product and paid.**
Download limit
This determines the maximum number of copies allowed to be downloaded by a single customer. Enter a numeric value to set the limit.
**VERY IMPORTANT NOTE: This parameter must have a value. If no value is inserted in this field, the downloadable product wouldn’t appear at the My downloads section even if the user has paid successfully for the order.
**
Download Expires(in days)
This will set a deadline for the product link to be active to download the product. If the deadline set to be 15 days, for instance, the link goes inactive on the start of 16th day.
All other options are same as simple product.
**VERY IMPORTANT NOTE: This parameter must have a value. If no value is inserted in this field, the downloadable product wouldn’t appear at the My downloads section even if the user has paid successfully for the order. **
A Step-by-step example to create a downloadable product
J2Store implements an innovative concept in creating products. It uses the Joomla articles as products. So to create a product is to create an article.
So, lets create an article.
Creating an Article
Have a look at the image below:

As given in the above illustration, click in the top menu or in the left pane of the control panel. You will get a new screen like this.
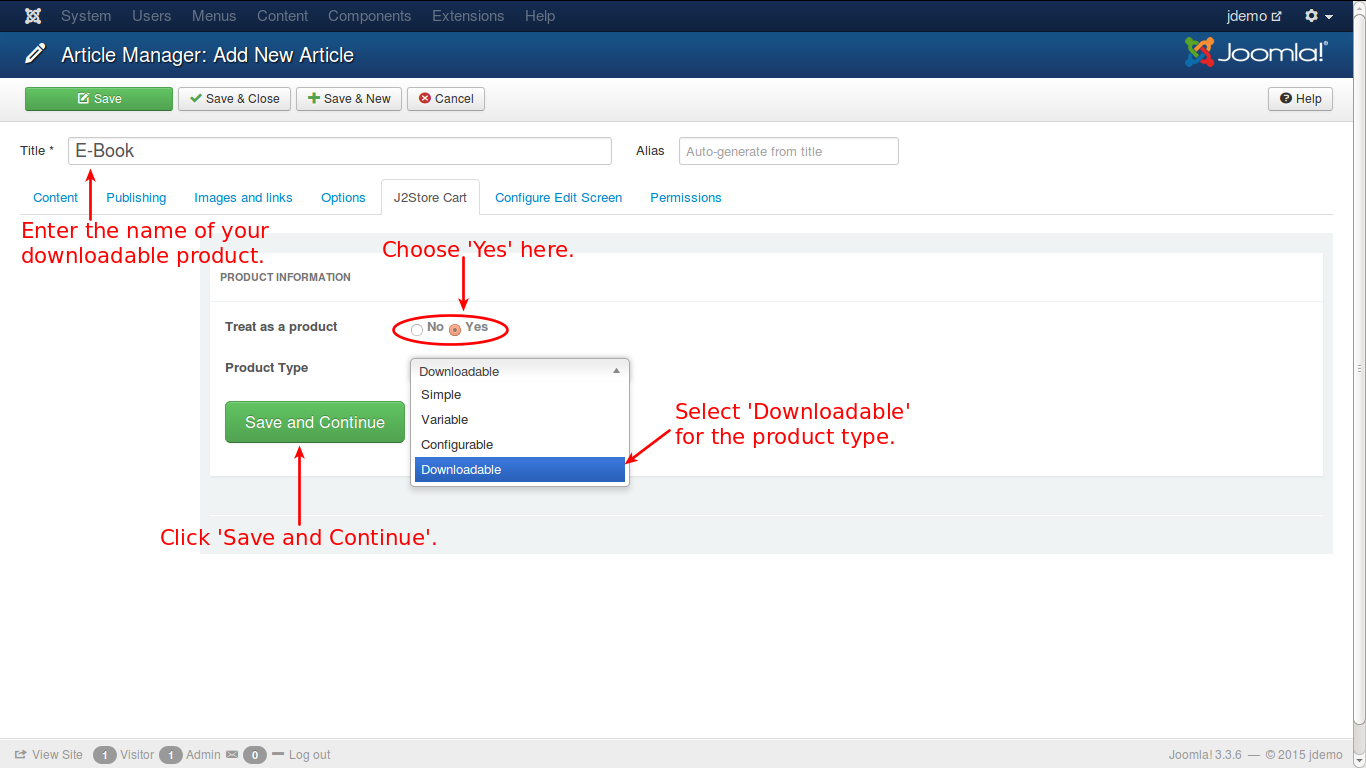
A downloadable product is one that has no physical existence. It can be downloaded as per the terms and conditions of the seller. It can be a book, a video, a music album or even a software extension like joomla extension. To create a downloadable product, follow the steps:
Enter the name for your product.
Since you are creating article, you need to tell that the article be treated as product. So, select ‘Yes’.
Select the type of the product, i.e., ‘Downloadable’.
Now, click the ‘Save and Continue’ button.
Your product is successfully created and a message will be displayed like this.
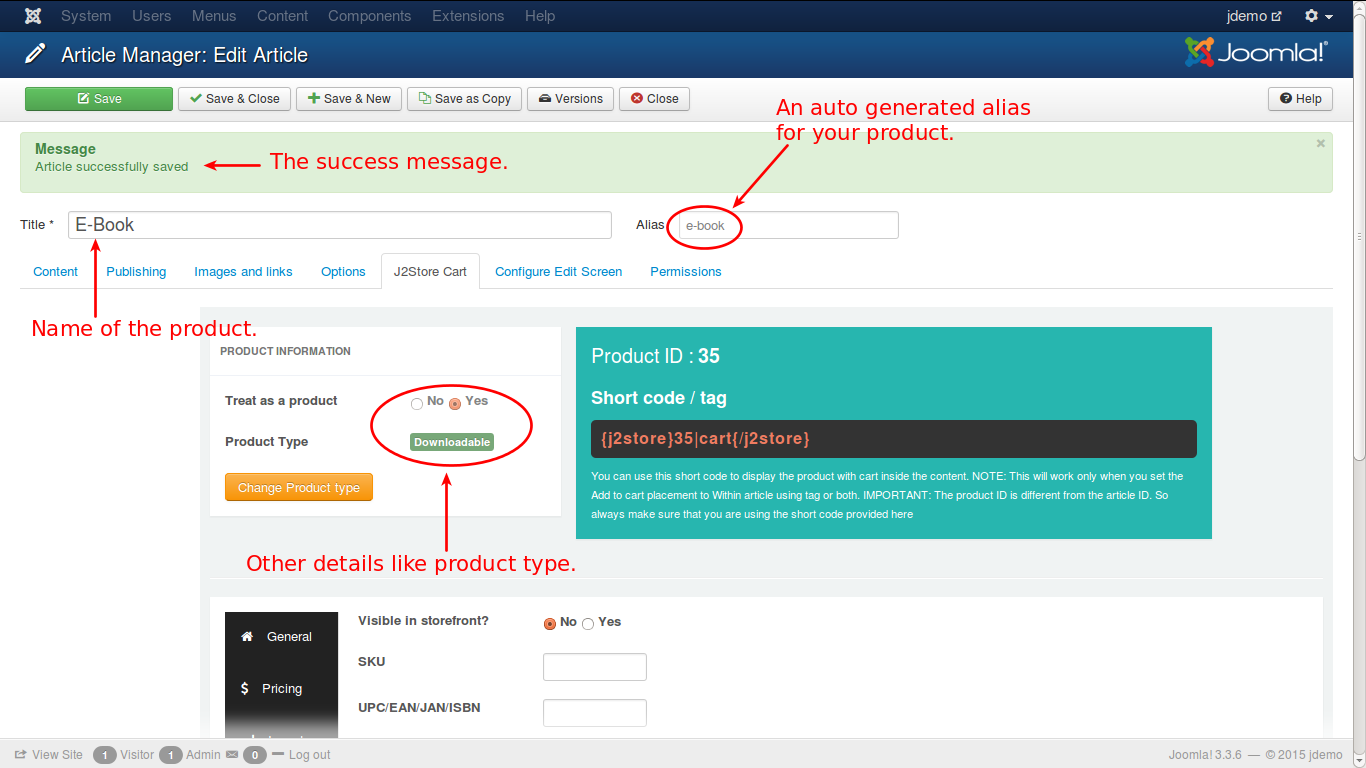
Add a description for the product, as illustrated below. 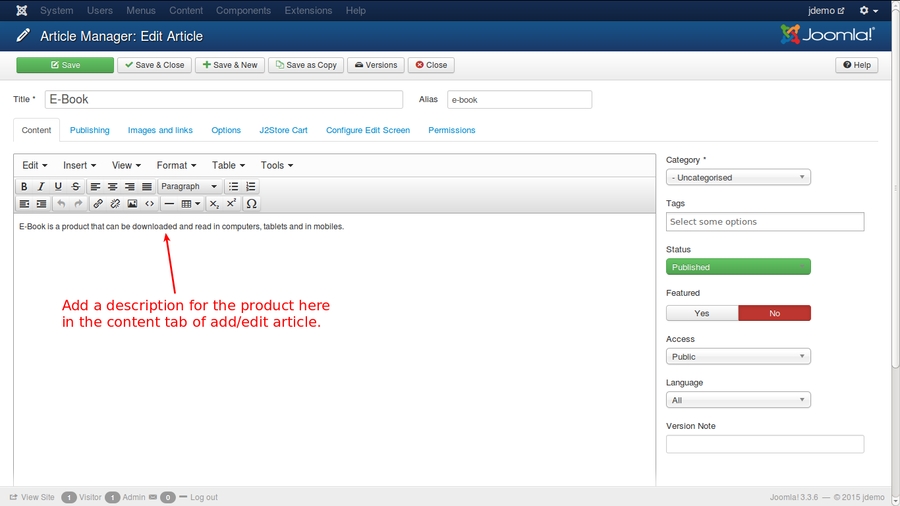
The Configuration process follows:
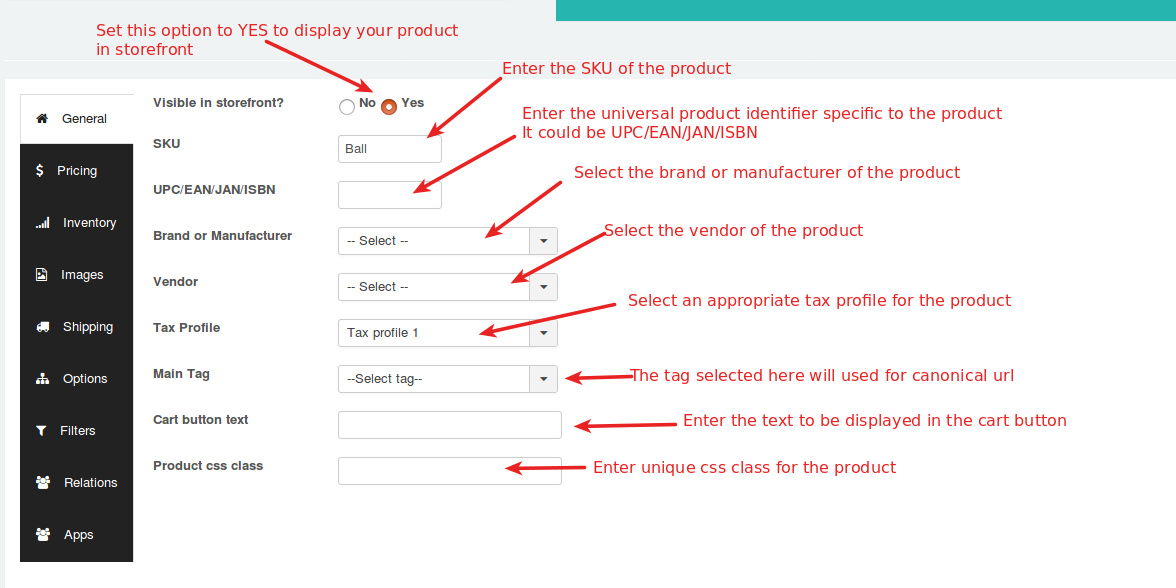
General
Enter the details as required by the fields in the tab, like, SKU, UPC/EAN, brand, vendor, tax profile and the caption for the cart button. Once you enter them, you can navigate to the next tab, pricing.
Pricing
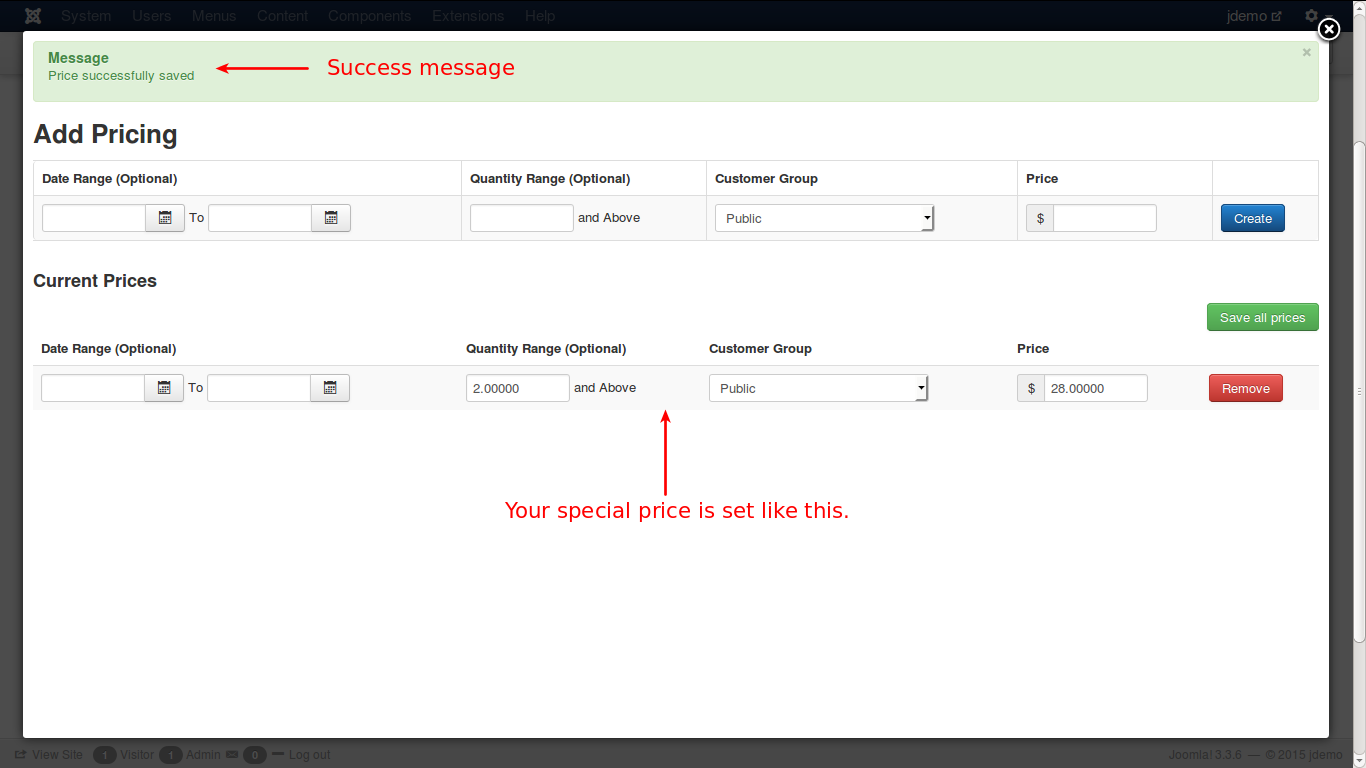
In Pricing you can set the price for your product. You have the option to set up advanced prices, like discount offers, as shown in the following images.
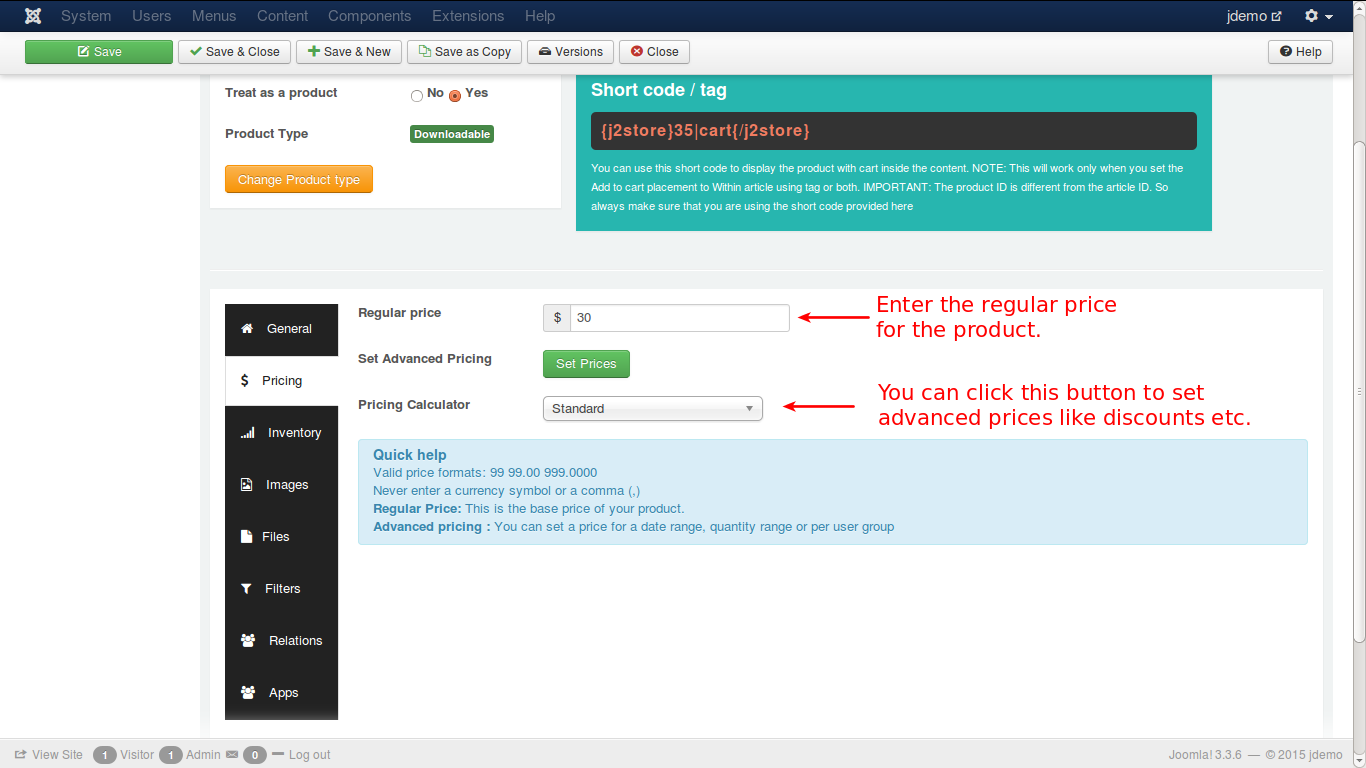
In the above image you set up the regular price for the E-Book. Click the set prices button to set advanced/special prices. It will pop-up a window to set the special prices, like this.
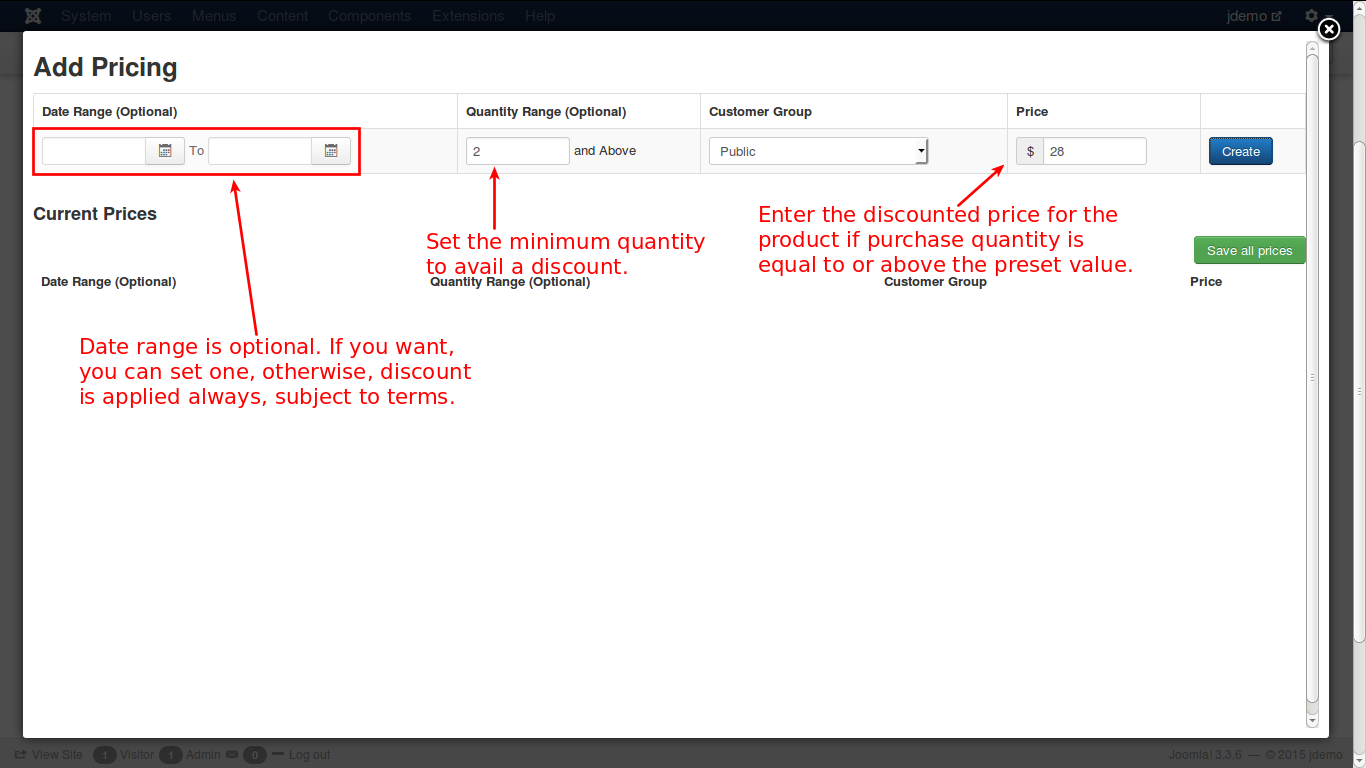
In the above image, you can set a date range for the special price, otherwise, you can leave it empty for the special price to be applied always. For example, if a customer buys 2 or more copies of the E-Book, you can offer a discount in price, throughout the year. Now, you have entered the values, and click the blue ‘Create’ button and you will get the special price listed below, as shown in the image.
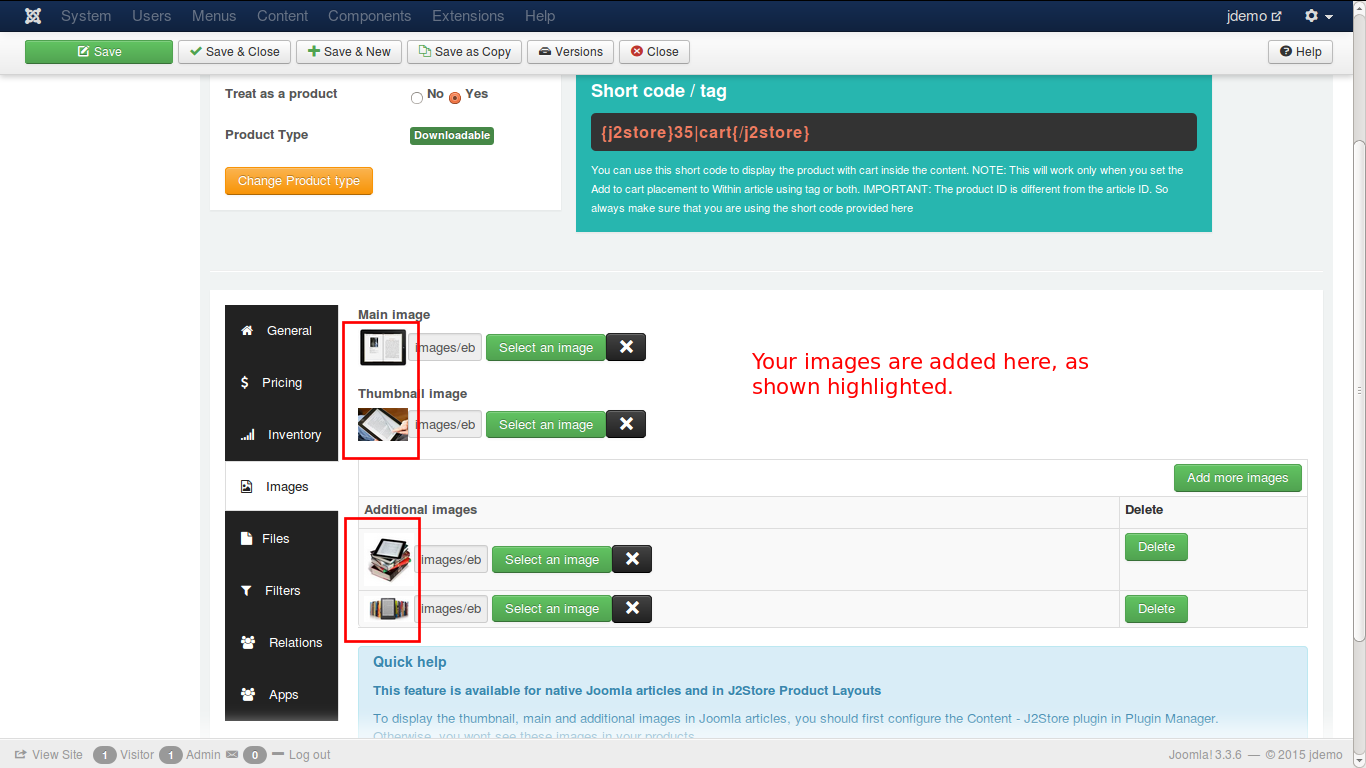
Images
When you select the images tab, you will get a screen like this.
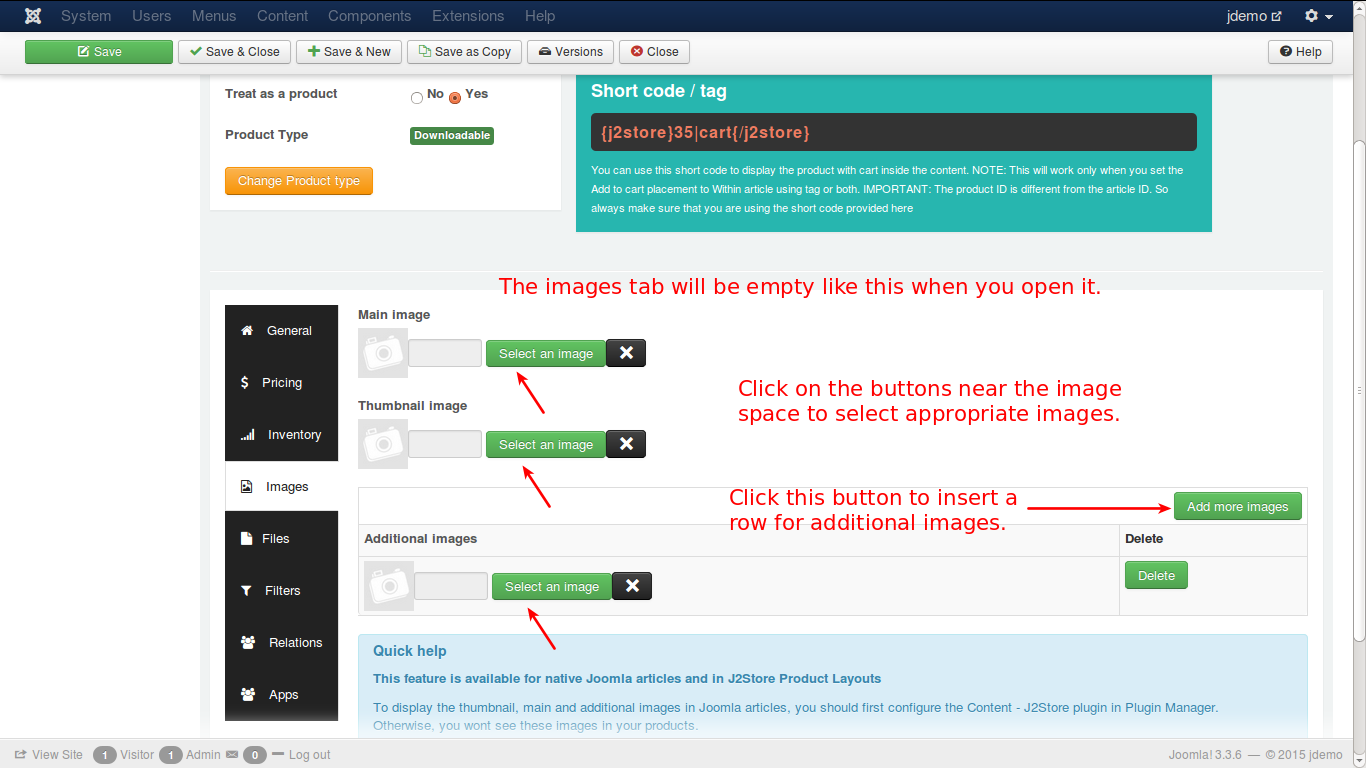
Click on the select an image button. You will get a pop-up window, where you can select suitable image for your ebook, as shown below:

Once you finish the selection, your tab will be like this.
Files
Unlike other products, you do not have options and shipping tabs for a downloadable product. But there is a unique tab, Files is present here. You must have a separate folder or directory in your site to place the downloadable products. From that folder, the product will be downloaded, when the buyer fulfills the requirements for the download.
The following steps will guide you to set up a folder with downloadable product.
Step 1 : Create a folder on your site to upload the files
You can use your Hosting Provider’s CPanel File manager or an FTP client like FileZilla, to access your web root (public_html / www / httpdocs ).
Once you are in the web root, you can create a folder. Name it as: myfiles.
Step 2: Protect the folder from outside access
We do not want people to access this folder using their browser and download files. So let us protect this folder using a .htaccess file.
Create a file called htaccess.txt in your computer and open it with your favorite text editor. Add the following lines to it.
order deny, allow deny from all
Save the file. Now upload it to the folder we just have created in our web root. In our example, it is myfiles.
IMPORTANT: Rename the file as .htaccess
All the files uploaded to this folder, are now protected.
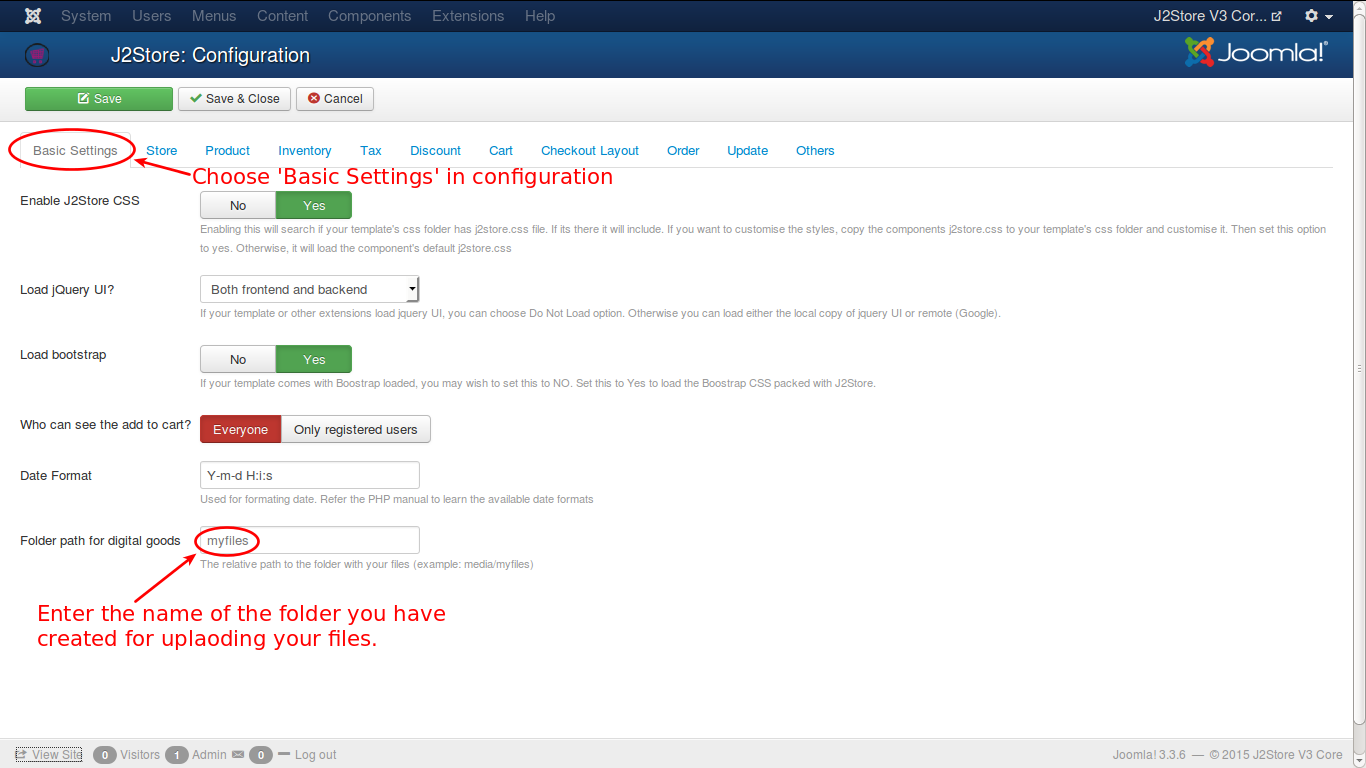
Step 3: Point J2Store to use the files in this folder.
Go to Joomla admin -> j2store Dashboard -> Set up -> Configuration -> Basic settings
In File attachment path field, enter the name of the folder that contains your files. In our example, it is: myfiles.
Check the image below:
Finally, save the configuration. You have created a folder to upload your digital products like ebook, pdf files, image files etc., set up protection mechanism from unauthorized access and configured the folder in your configuration page.
Now, Configure your Files tab in your downloadable product creation.
The tab will look like this:
When you click the set files button, you will get a pop-window to select the file to be downloaded. See the picture.
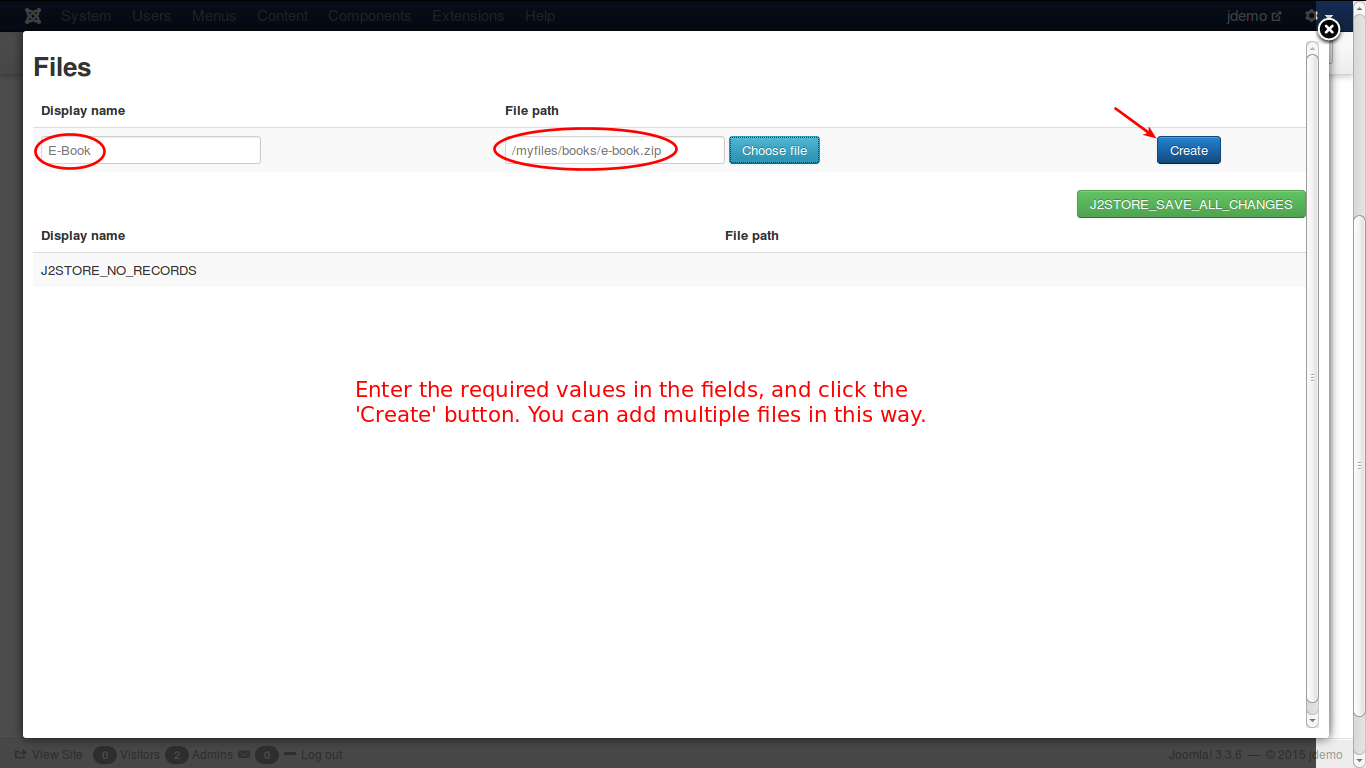
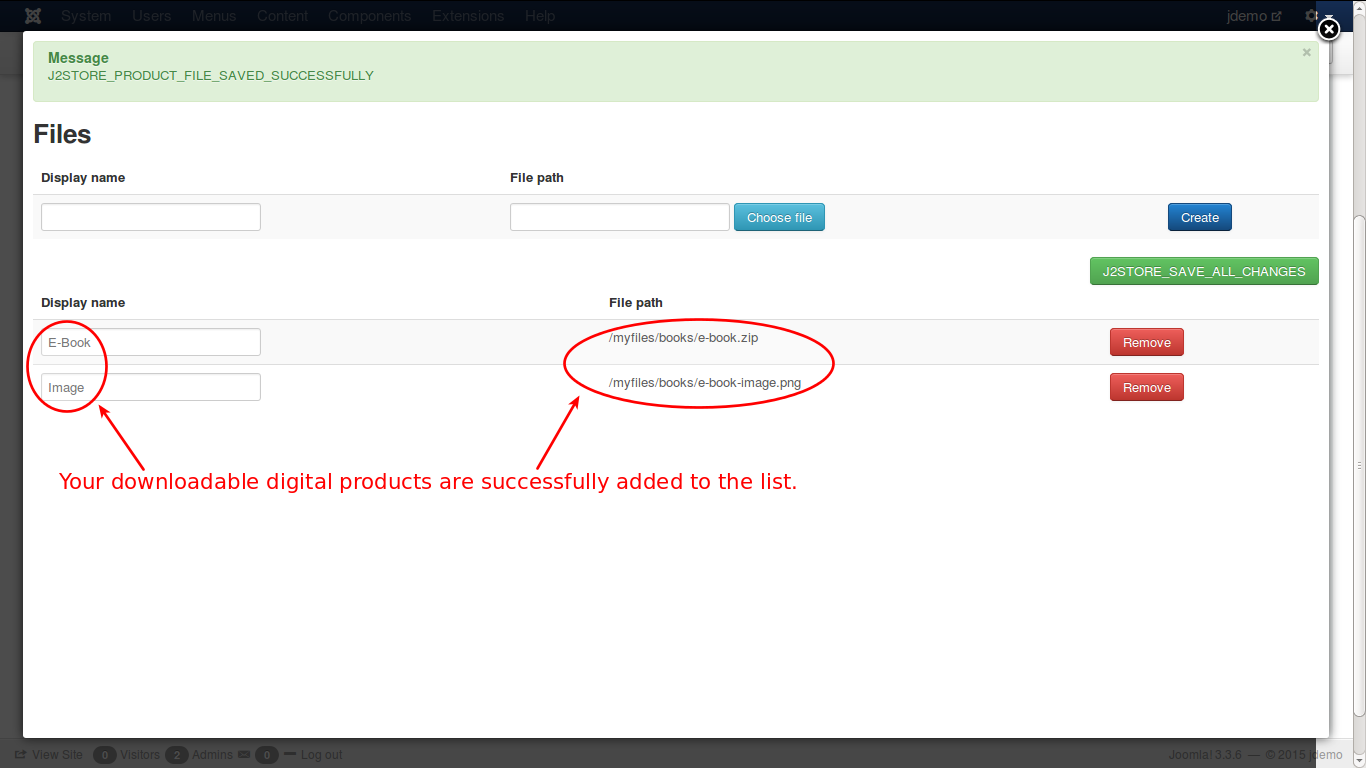
And select the file and click the create button, and you will get the product listed below as shown in the picture. You can add as many files as you can to the folder. When a customer purchases the product, all the files associated with the product will be available for download.
Set the download limit (0 for unlimited downloads) and expiry of the download, in days, as shown in the picture below:
Let us create a Downloads Area for the customers
Go to Joomla admin -> Menus -> YOUR MENU
Click New to create a new menu
Enter a Name
Click Select against the Menu Item Type. You will get a popup
Choose J2Store -> My Profile
Save
Check the image below.
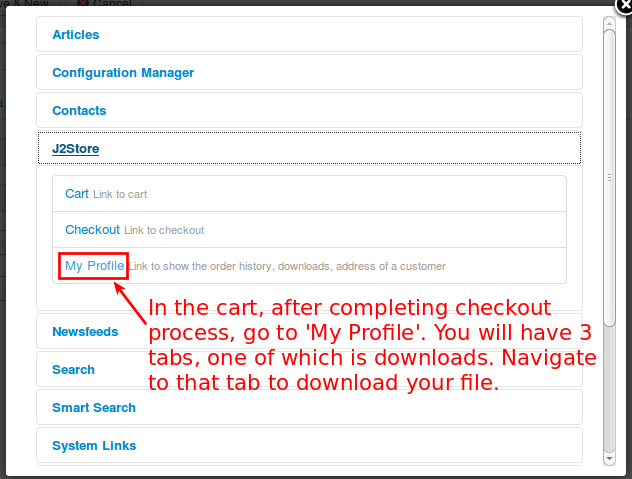
You just have to tell the customers to visit this menu to get their files after the purchase.
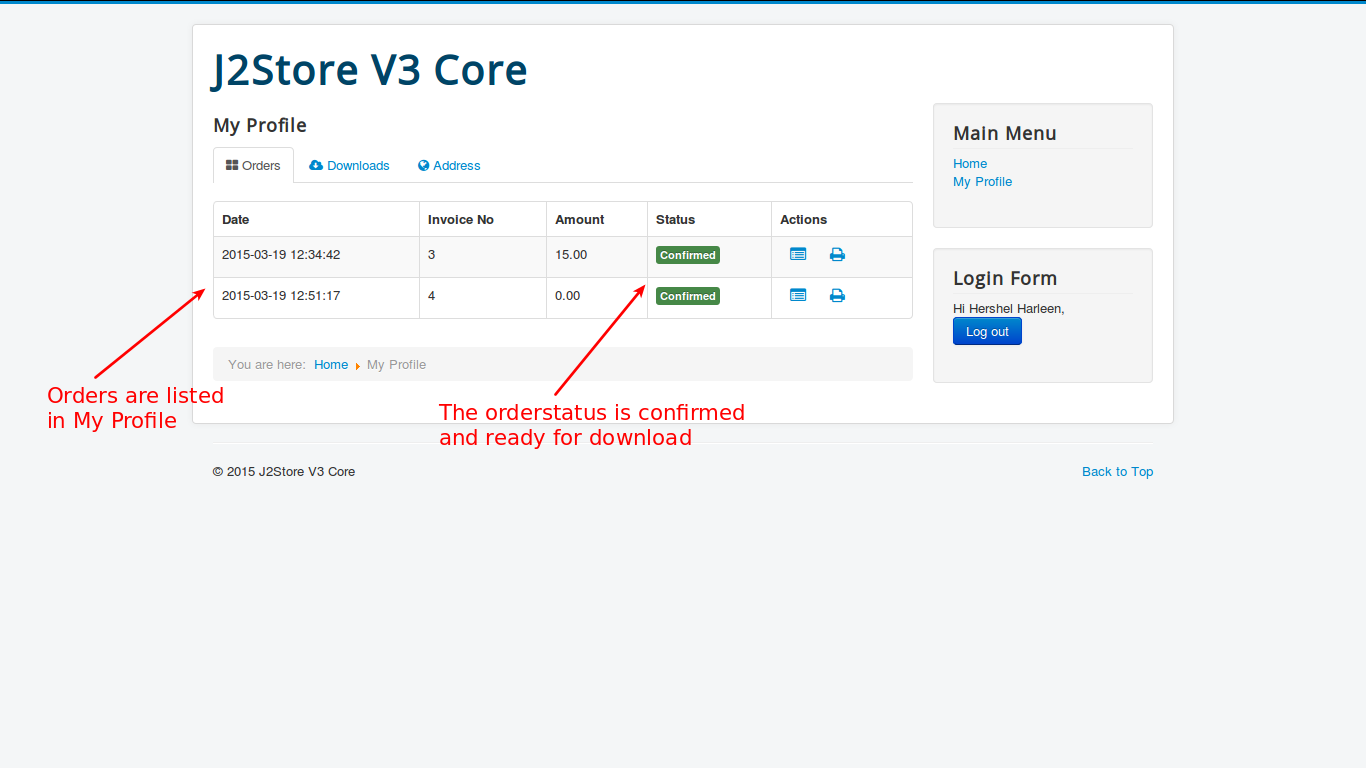
When the customer purchases the downloadable product, and finishes the checkout process, the order is completed and the status become ‘Confirmed’. If My Profile is clicked, the orders will be listed as shown below:
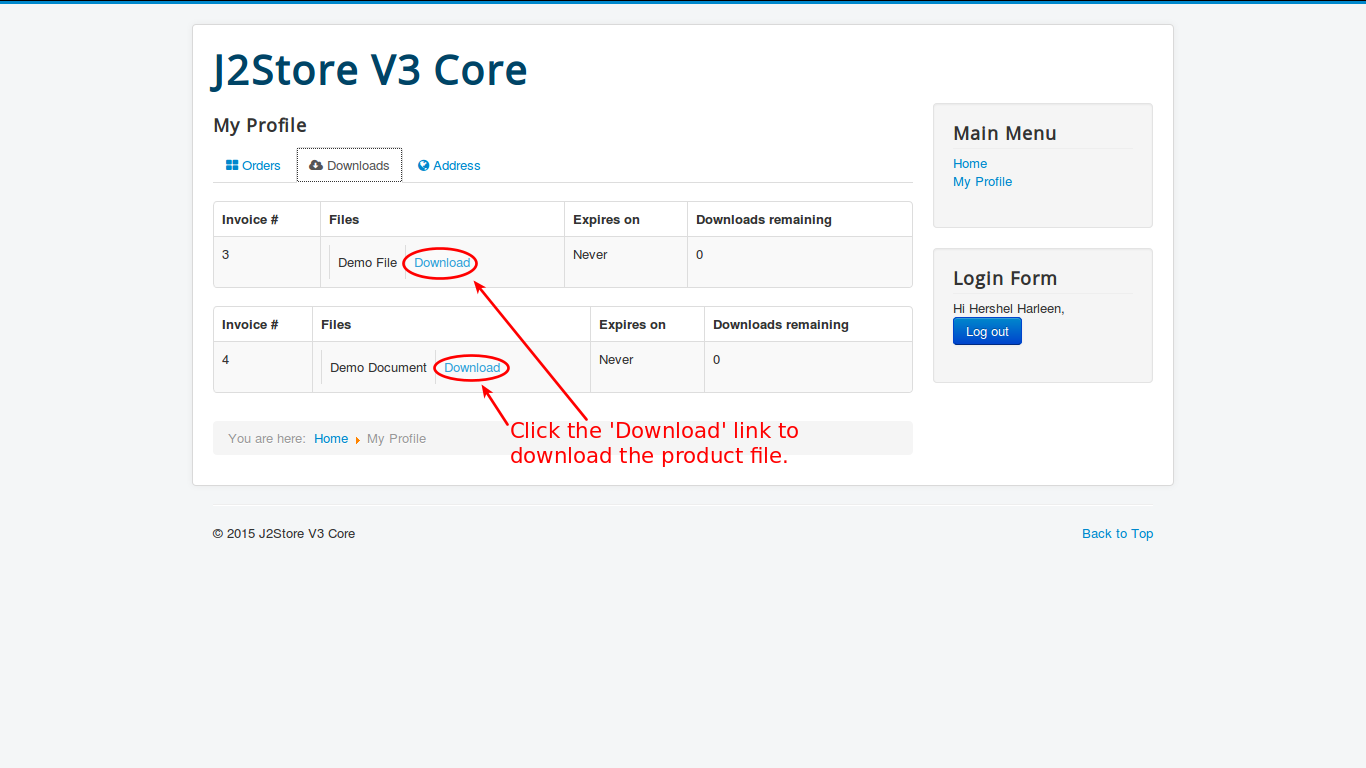
And when ‘Downloads’ tab is clicked, it will show the download link like this:
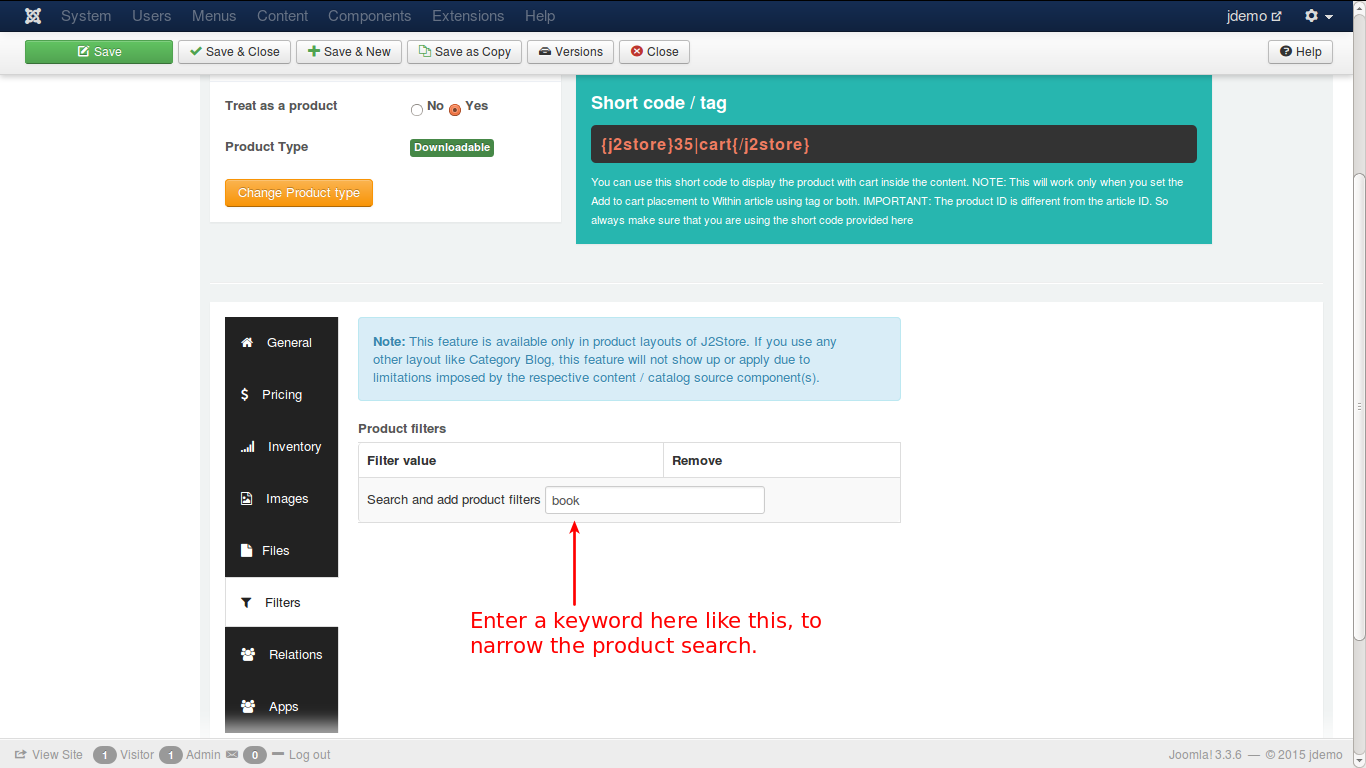
Filters
The filters will help to narrow the product search, for specific products. For e.g., if you add filter with value ‘music’, the search will display only music files.
See the image below:
Relations
The next tab is Relations. Here, you can add products of higher value than the one being viewed by the customer and recommend the customer to buy that product, citing its advantages and additional features. This is an upsell.
Refer the image below:
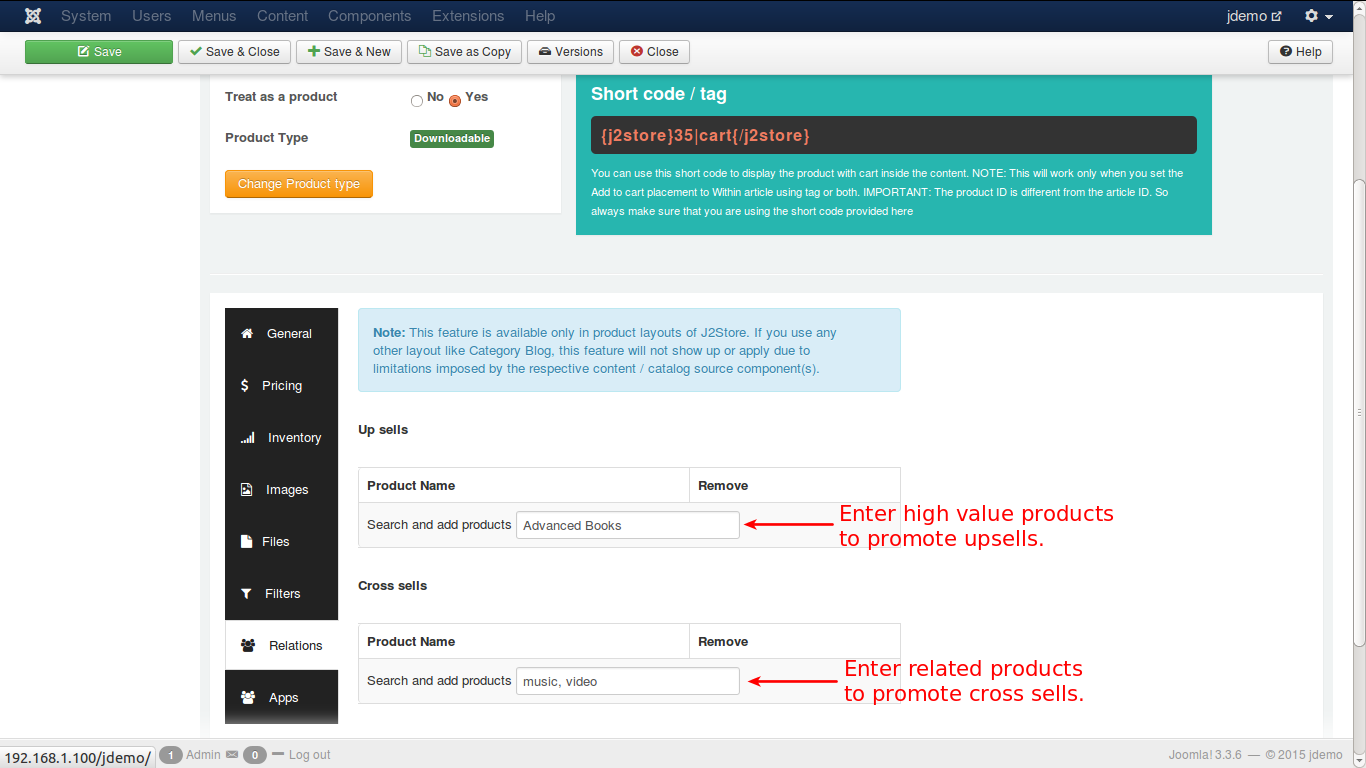
Also, you can add some other products to convince the customer to buy theses products additionally. This is cross sell.
For more detailed explanation, refer to the Relations section of the Downloadable Product.
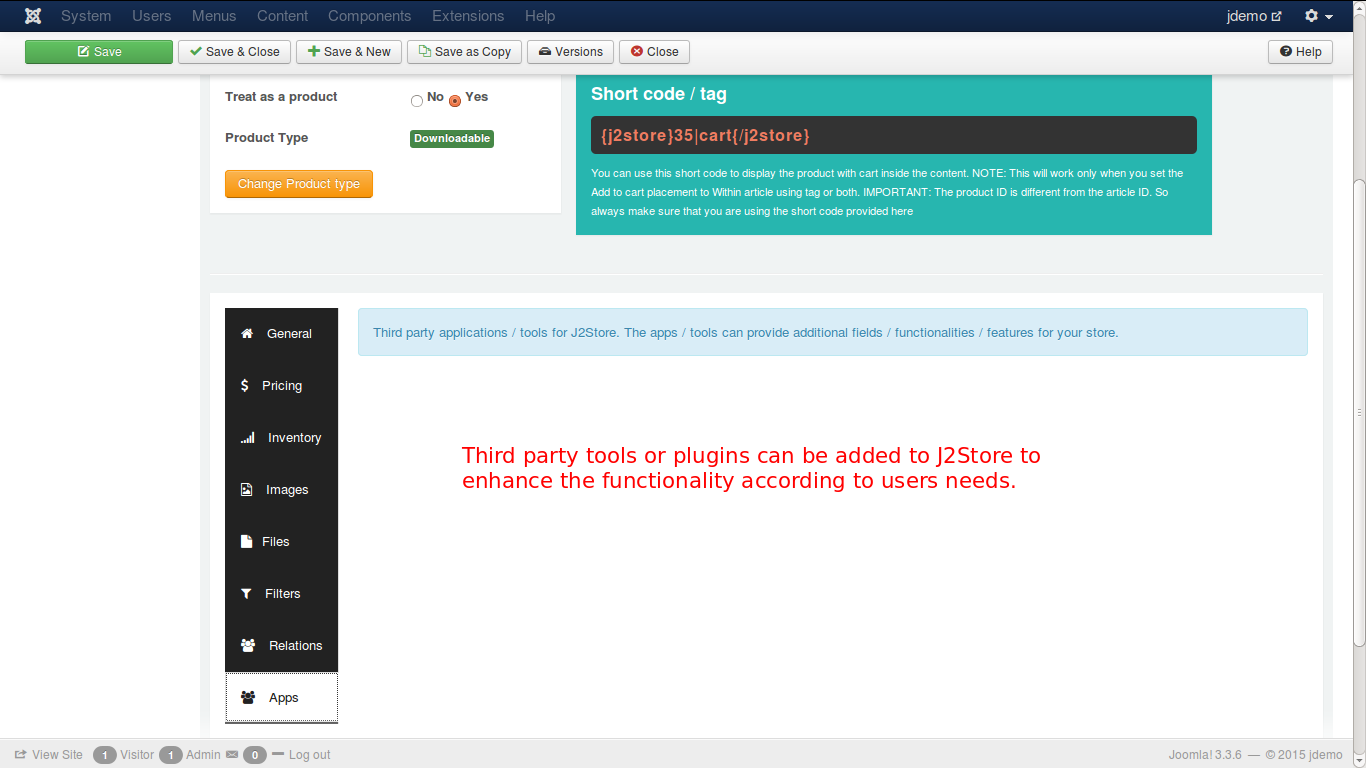
Apps
In this tab, you can add third party tools or plugins, that are available, to enhance the J2Store functionality, like adding additional fields, applications, functions or features.
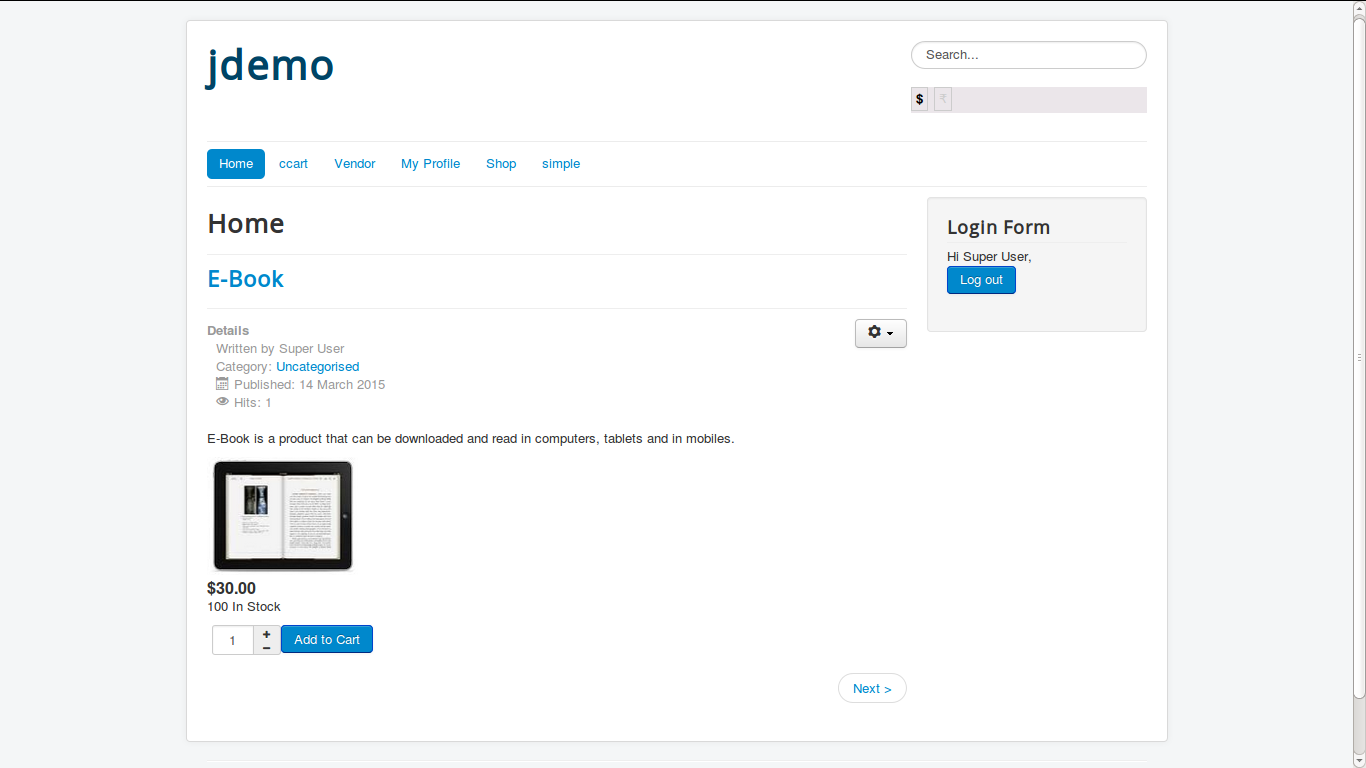
Now, lets have a look on how your product is viewed in your online store. Check the image below:
How to sell files that are stored externally?
If you have files stored externally, like on your Dropbox account or on your Amazon S3 bucket, then you could sell them on your store using the following extensions respectively:
To sell files stored on the Dropbox account:
Use the app found here
To sell files stored on the Amazon S3 bucket: Use the app found here
How to reset the download limit for a single user:
Let us assume that you have provided download limit for a product as 1 and the user has downloaded the file.
Now, he wants to download the product again.
Here is how you could reset the download limit for that user alone:
To reset the download limit for a single user:
Please navigate to J2store->Sales->Orders-> Order of the downloadable product.
Click on the checkboxes mentioned in the below screenshot and click save.
 This would reset the download limit and expiry date only for that particular user.
He would be able to login to his my profile page and download it once again the number of times you have allowed on the product.
My downloads section doesn’t have a download link
The downloadable file link would be listed at the My downloads tab of the user’s My profile page only when:
The order is in confirmed status
The user should have paid for the order successfully and the order should be in confirmed status. Only then the file would be listed in the my downloads section of the user.
There should be a download limit, download expiry and file set up
In the product article, the following parameters shouldn’t be left empty:
Download limit
Download expiry(in days)
File
The Folder path for digital goods should not have a slash in the path
Under J2Store->setup->configuration->basic settings tab, the path you set should not start with a slash.
Example: the path should be set as: media/j2store and not /media/j2store.
Video Tutorial
Here is a video that could help you create a digital product:
Last updated