
Configuration
There are several options available for your online store. Any mis-configuration here will affect your storefront’s behavior. So take your time and configure the store correctly.
The configuration page has several tabs. Each one is explained in detail. They are:
Basic Settings
Store
Product
Inventory
Tax
Discount
Cart
Checkout
Order
Update
Mail Template
Others
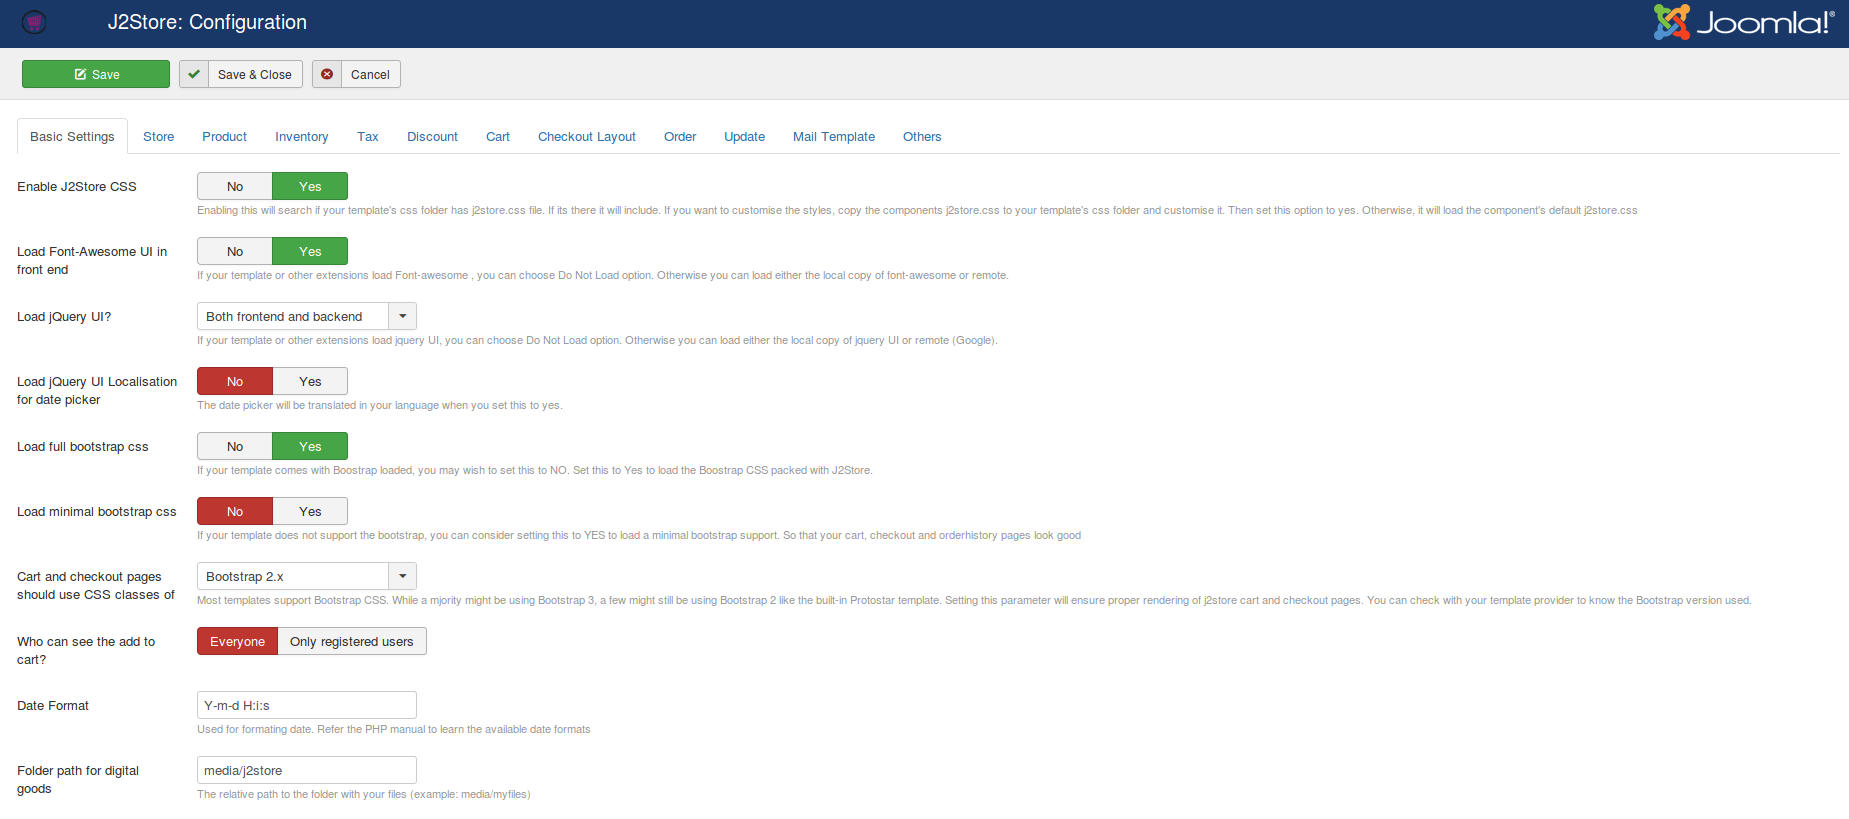
Basic Settings
Some basic settings need to be done before you proceed. This will be handled by the following options.
Enable J2Store CSS
If this option is enabled, J2store loads the j2store.css file for customizing the template style. First, this will look in to the template CSS file. If it is not included, then J2Store loads it own J2Store.css file.
Load Font-Awesome UI in front end If your template or other extensions load Font-awesome and wants to disable loading Font Awesome from J2Store, you can choose NO. Otherwise you can load either the local copy of font-awesome or remote.
Load jQuery UI
This option is same as the previous one. Here, there are four options available for selection.
No -> Do not load jQuery UI
Only Frontend -> Load jQuery UI for frontend only
Only Backend -> Load jQuery UI for backend only
Both frontend and backend -> Load jQuery UI for frontend and backend
Load jQuery UI Localisation for date picker The date picker will be translated in your language when you set this to YES.
Load full bootstrap css If the template is loaded with bootstrap, and if the user does not want it to be loaded, the user may choose NO, otherwise choose YES to load the default Bootstrap CSS packed with j2store.
Load minimal bootstrap css If your template does not support the bootstrap, you can consider setting this to YES to load a minimal bootsrap support. So that your cart, checkout and order history pages looks good.
Who can see ‘add to cart’ This is an option for the user to add his/her product of choice to the cart to proceed for billing. This can be set to be viewed by ‘everyone’ or for ‘registered users only’.
Cart and checkout pages should use CSS classes of This option is used to render the cart and checkout pages in proper layout. Choose the option based on your template’s bootstrap version. If your template’s bootstrap version is 3, select Bootstrap 3.x and if your template’s bootstrap version is 2, then select Bootstrap 2.x.
Date Format Here one can choose the display format of date from several available options
Folder path for digital goods The relative path to the folder with your corresponding files. Eg., ‘media/myfiles/xyz.css’
NOTE: The file path shouldn't start with a frontslash.
Store
Configure the address, administrator email and some defaults for your storefront
Security keys for queues and crons This security key can be used for execution of queue and cron jobs required by apps and plugins. This will ensure only legitimate requests are allowed and executed. The cron / queue requests without this key will be denied access.You could regenerate this key by clicking on Regenerate button.
Maximum Queue repeat Set maximum queue repeat for Queue system.
Store Administrator Email(s) This is administrator’s email and can have multiple emails, separated by comma. The order notification and payment validation errors will be sent to mail ids provided here. You could also test by sending a test email by using the TEST email button below this option.
Store Name Name of the store. One must enter a valid store name.
Address, City The address and city of the store is not mandatory. You can enter an address or simply leave the fields empty.
ZIP/Postal code Enter a valid postal code for the store. This field can not be empty. Check the image below to understand how to enter emails, store name and address etc.
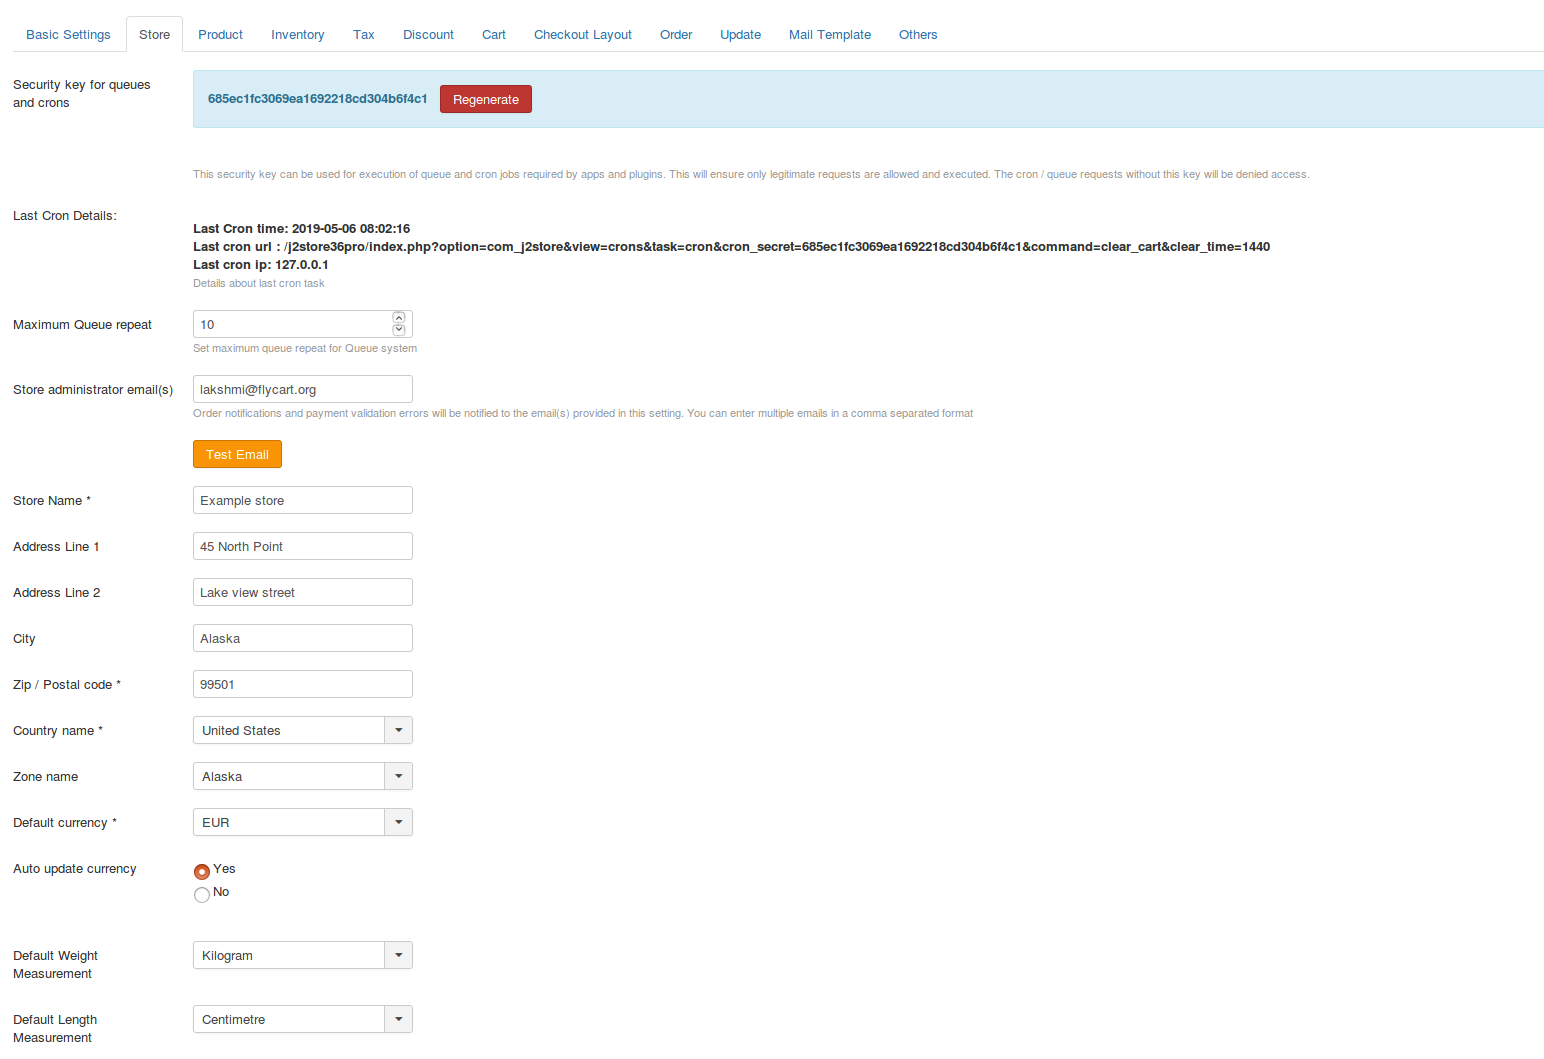
Country Name Name of the country in which the store exists. To be selected from the given list.
Zone Name Name of the zone in the country. To be selected from the given list.
Default Currency The currency that has been a legal tender in the country. To be selected from the given list.
Auto Update Currency Setting this option to Yes will automatically update the latest exchange values for the currency that is being dealt with. For e.g., the daily exchange values of INR against US $ will be updated automatically.
Default Weight Measurement Select the default weight measurement in use for any country from the available options. (Kilograms, Grams, Ounce, Pounds)
Default Length Measurement Select the default length measurement in use for any country from the available options. (Centimetre, Inch, Millimetre)
Product
These are global parameters for product display. You can override some of these parameters if you are using the J2Store’s product layout.
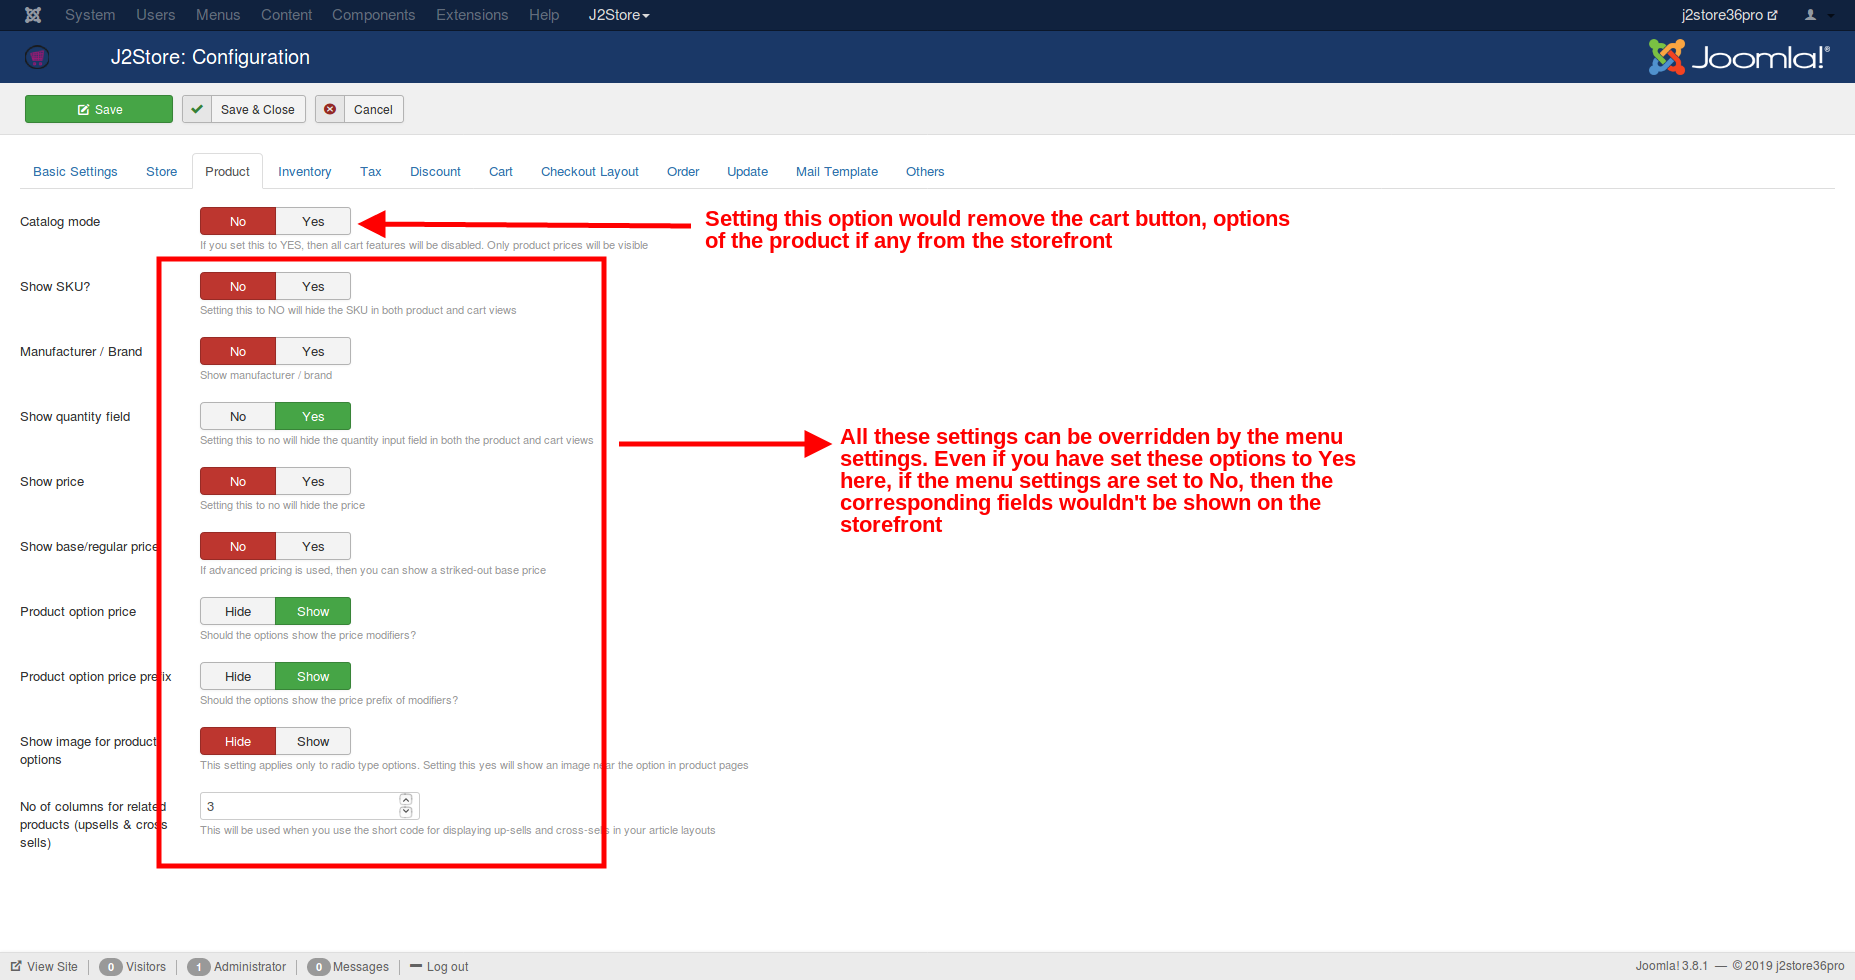
Catalog Mode Setting this option to ‘Yes’ will disable all the features of the cart except the ‘price’ of the product.
**Show SKU? ** SKU stands for Stock Keeping Unit. If this option is set to ‘No’, the SKU will become hidden in both product and cart views.
Manufacturer/Brand If it is set to ‘YES’, the manufacturer name will be visible.
Show Quantity Field If it is set to ‘Yes’, the manual input for quantity will be visible, else quantity can not be given manually.
Show Price To hide the price of a product, set this option to ‘No’.
Show Base/Regular Price If advanced pricing option is used, i.e., a discount is offered on base price, it can be displayed using this option by setting it to ‘Yes’. It will show the base price in striked out format.
Example: In J2Store we can set the base price for the product and we can also offer some discount on base price. This discount on base price is called advanced price. If this option is Enabled(set to ‘Yes’), it will show the base price in stroked out format and display the advanced price. Let’s assume that the base price of a product is $ 300.00 and it is offered a discount of $ 50.00, then the new price will be $ 250.00 It will be displayed as below: $ 300.00 (This is the base price) $ 250.00 (This is the advanced price)
Product Option Price If this option is set to ‘Show’, product option price will displayed along with the option name.
Product Option Price Prefix This option will work only when the previous option is enabled. Setting this option to ‘Show’, will show the prefix for price modifier. i.e., a modifier ’+/-’ will be shown in the view, to modify the product price.
**Show Image for Product Options ** This will be applicable for radio button option only. Setting this will show an image near the options in products page.
**No of columns for related products (upsells & cross sells) ** This will be used for up-sells and cross-sells display layout when you use the shortcode for displaying up-sells and cross-sells in your article layouts.
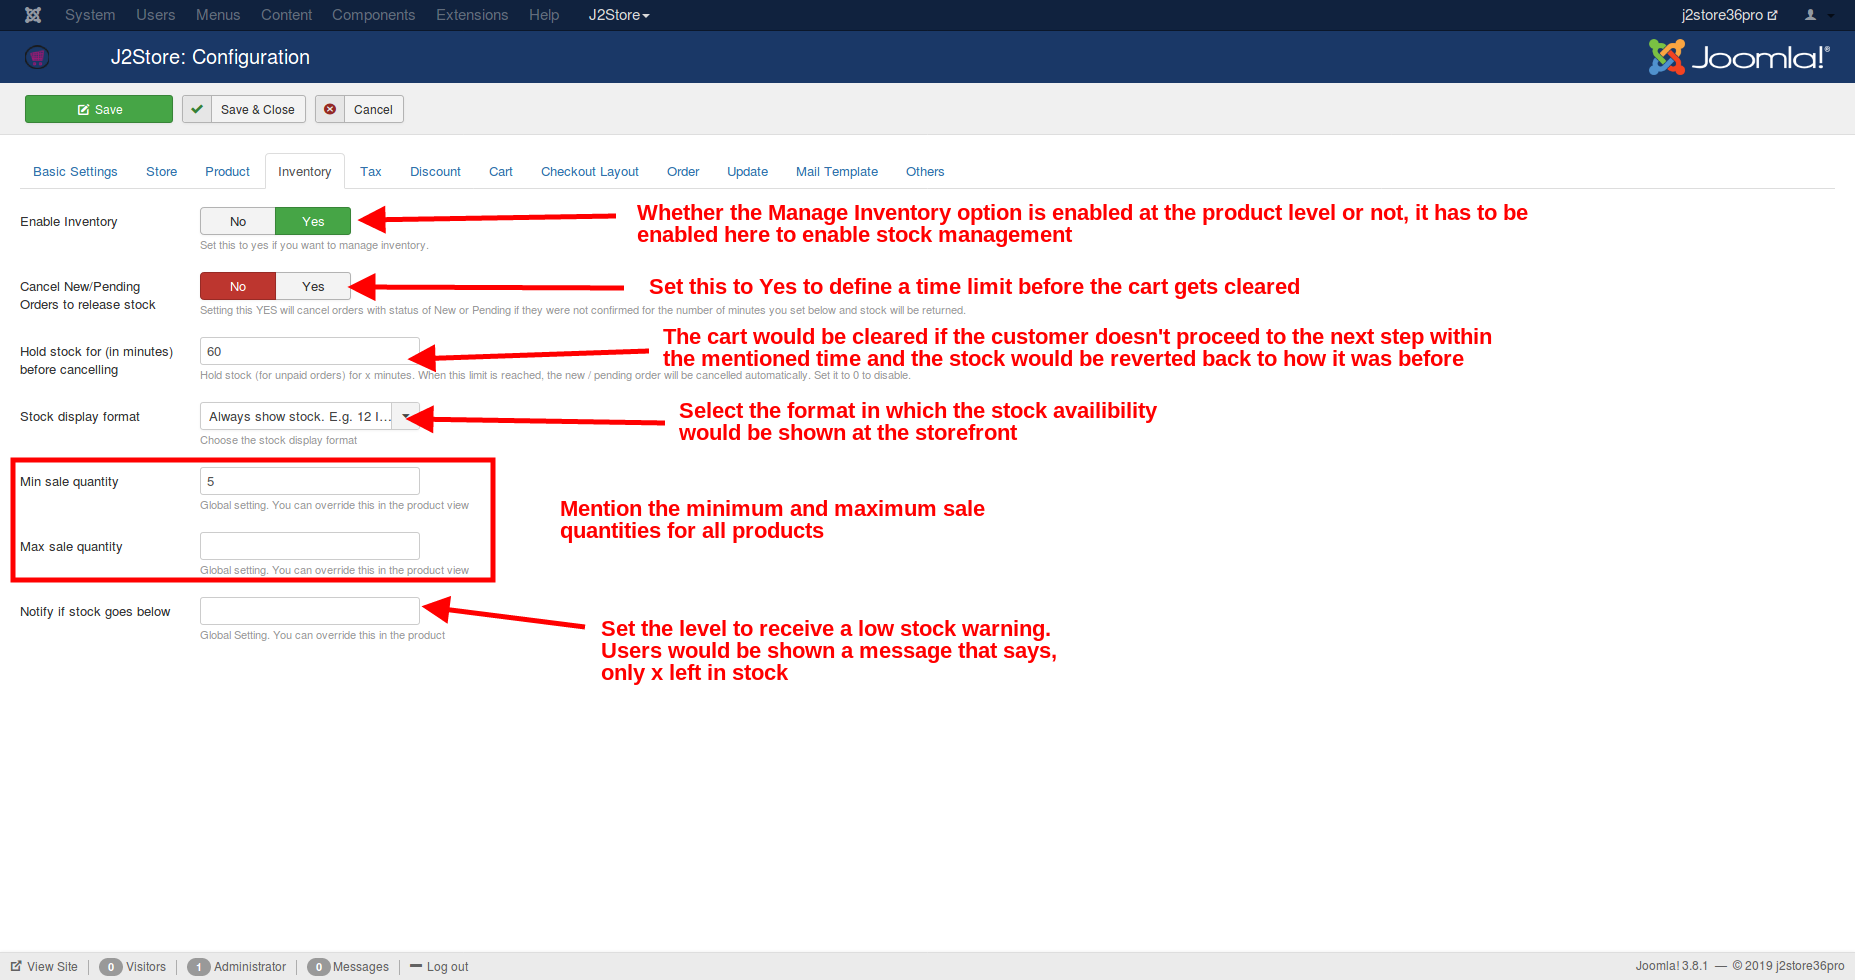
Inventory
Enable Inventory Set this option to ‘Yes’ to enable inventory management. Provide the available quantity when a product is added and it will be kept in track whenever an order is processed. Upon successful completion of an order, the ordered product quantity will be deducted from the available quantity and the result will be the new available quantity and when available quantity for a particular product becomes zero, the add to cart button will be disabled. Also, the user cannot enter a quantity greater than available quantity.
Cancel New/Pending orders to release stock Enabling this option by setting it to ‘Yes’ will cancel the orders with status ‘Pending’ / ‘New’, if they were not confirmed within the stipulated time, and the stock will be released and added to available quantity.
Hold stock for (in minutes) before canceling If the previous option is set to yes, this option will be enabled for entering the allowed time for order confirmation, else, it will stay disabled.
Stock Display Format This option is used to display the available stock. There are three formats available for the view.Always Show Stock e.g., 12 in stock.Show only when stock reaches low stock threshold. e.g., only 2 left in stock.Never show stock.
Min Sale Quantity This global setting default value is 1 and it can be overwritten for user’s desired quantity in products view.
Max Sale Quantity Global setting. By default, it is left empty. It can also be overwritten.
Notify if stock goes below The global setting for this field is empty and it can be overwritten for the user’s desired quantity. And when the stock goes beyond the preset level it will be notified. Check the image below for a clear understanding.
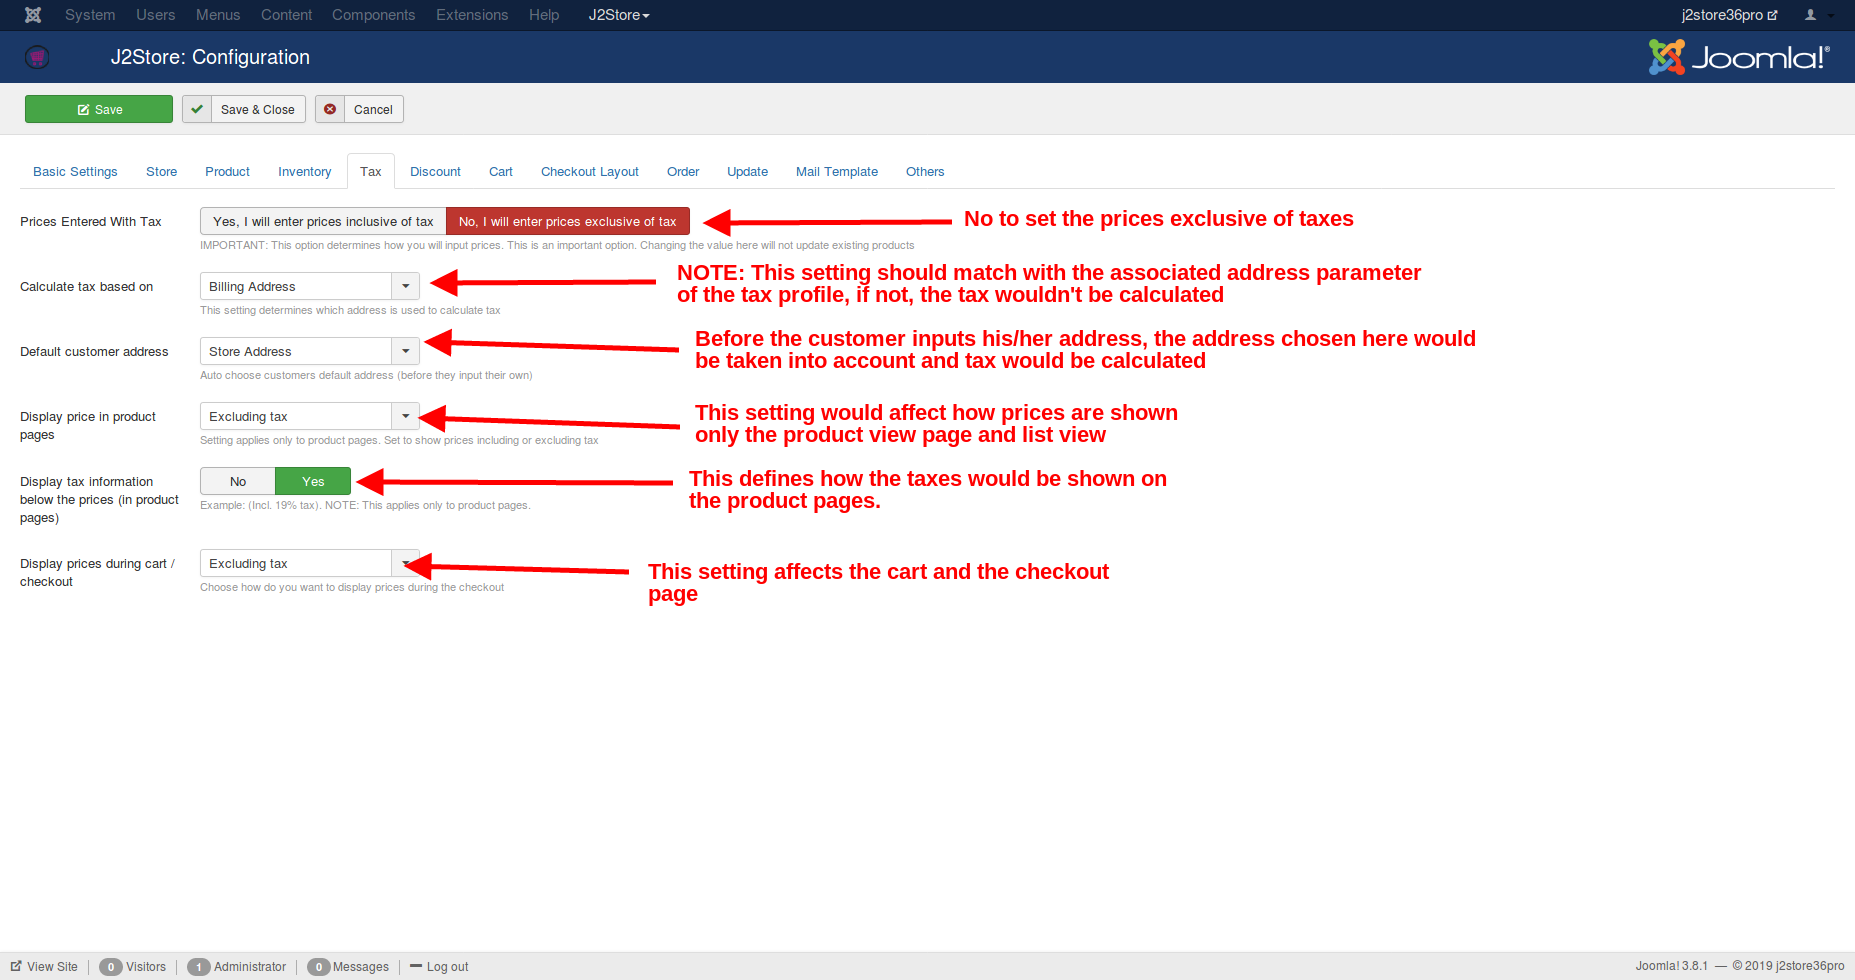
Tax
An important area. Please think twice before you configure. Read the description carefully while configuring the following options.
Prices Entered with tax This is a very important option which deserves careful attention when entering the price of a product. The two options are:Yes, I will enter prices inclusive of tax No, I will enter prices exclusive of tax The price entered initially will be the one till the end. Later alterations will not reflect in the product price.
Calculate Tax based on Three options available. Based on the option selected, tax will be calculated since the tax may vary depending upon the address.Billing Address Shipping Address Store Address
Default Customer Address Customer’s address should be selected automatically from the available options in the list, before the customer inputs his/her own. Price Display Options Price of a product can be displayed in three formats.
Only the price of the product.
Price inclusive of relevant tax, as a single figure.
Price and Tax separately.
Display tax information below the prices (in product pages) Set this to YES will display (Incl.19% tax) or (excl.19% tax) to product pages.
Display prices during cart / checkout Excluding tax Choose how do you want to display the prices(including tax or excluding tax) during the checkout. One of these options can be selected here. Check the image below for a visual aid:
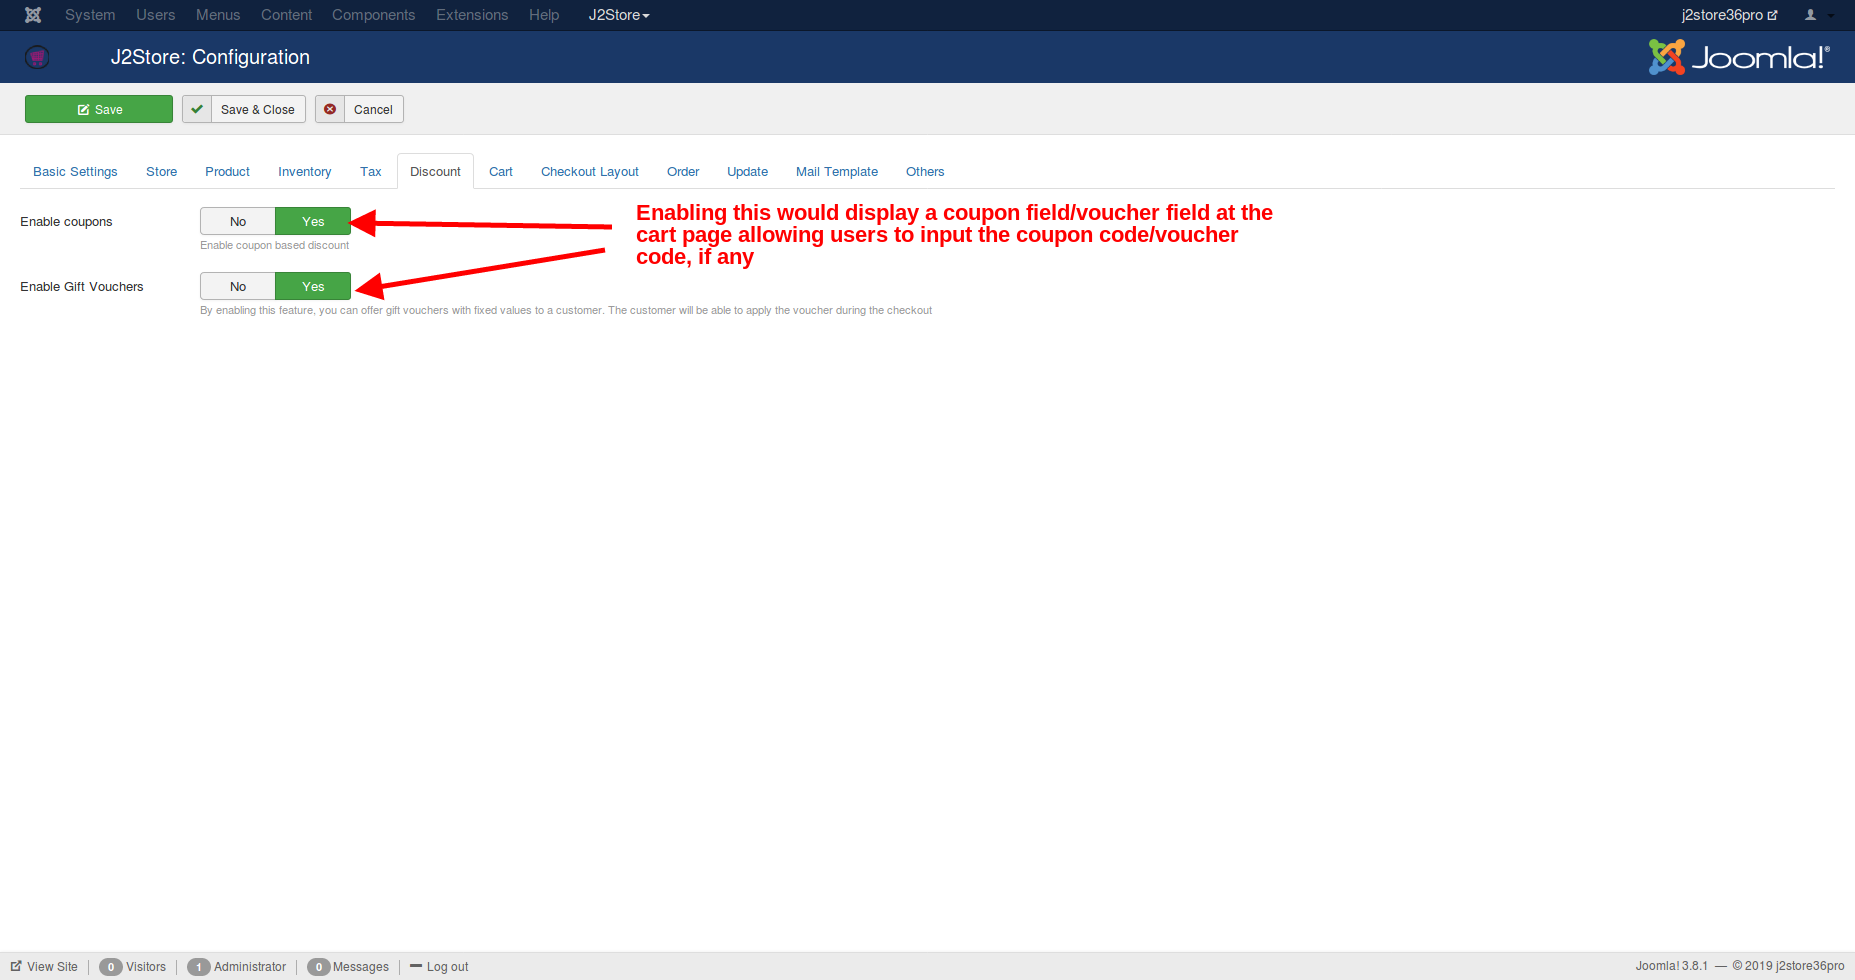
Discount
This is a J2Store PRO exclusive feature This is for discounts that are offered to customers.
Enable Coupons By default this option is set to No. If the product has some discounts based on the coupons, then set this option to Yes.
Enable Gift Vouchers By enabling this option with a ‘Yes’, the customers can be offered gift vouchers with fixed value, say $ 25.00, which in turn, can be applied during the checkout.
Cart
Cart and checkout settings for your store.
Add to Cart Placement This option is for placing the add to cart button. Three options are available to choose.
Default Position: If this option is selected, the add to cart button will be shown at the bottom of the product.
Within Article using Tag: A tag can be added with article id (e.g., {j2store}5|cart{/j2store}) inside the text in a desired location, and j2store will place the add to cart button in that location.
Both: Selecting this option will display the add to cart both at the bottom and also parse the tag, provided one (e.g., {j2store}5|cart{/j2store}) is added in the article text.
Add to cart action This option helps to decide on what has to be done when the add to cart button is clicked by the customer. Two options has been provided. Stay in the same page and show an inline link to a predefined location Redirect to default view of the cart
Continue Shopping URL After a product is added to the cart, the customer has been offered with three options to choose from, if the customer wishes to continue shopping. Redirect to the previous page where he added the product Redirect to a menu Redirect to a custom URL
Add to cart button class This option is used to set the CSS class for the add to cart button.
Empty cart redirect URL Choose the url where a customer should be taken when cart is empty. Cart view To a menu To a custom url
Product Thumbnail Enabling this option by choosing Show will display the thumbnail image of the product in the cart view.
Show Tax for each cart item If this option is set to Yes, tax will be levied for each item in the cart.
Enable Shipping address fields If the product has to be shipped to an address different from the customer’s billing address, it can be added by selecting this option to Yes.
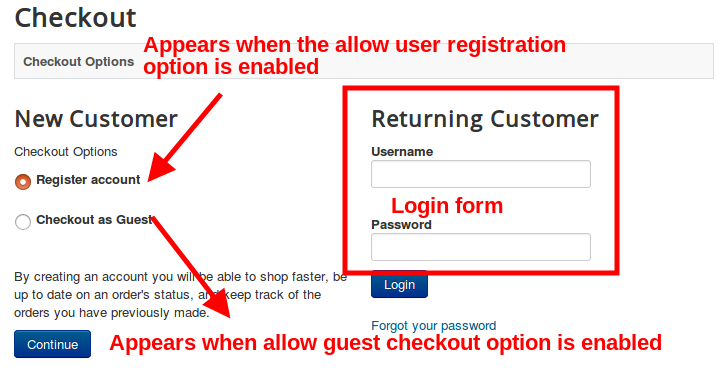
Show login form during checkout Enabling this option to Yes will show the login form during the checkout process, if a customer is not previously logged in during shopping. Without logging in, the customer cannot checkout, if this option is set to Yes.
Allow quick new user registration Enabling this option would display a registration option at the checkout like this:
Joomla password validation If set to yes, Password will be validated based on Joomla User manager > Options settings for password rules.
Allow Guest Checkout ? Setting this option to Yes would display the guest checkout option at the checkout. If you wish to allow only the guest checkout option, you could enable this alone while disabling the login form option and registration option.
Show customer note Setting this to No would disable the customer note option at the final step of the checkout. Customer note field can be useful to receive suggestions from users regarding their orders.
Show tax and shipping estimate tool When you wish to display the tax and shipping estimator at the cart, this option has to be enabled. The shipping and tax estimator may help users know an estimate of their shipping and tax costs at the cart page itself before they proceed with the checkout.
Show Empty Cart button Enabling this option would display an empty cart button that would help in clearing the cart altogether.
Make postal code required in the shipping/tax estimator This option would make the entry of zip code a mandatory field in the shipping and tax estimator on the cart page.
Clear cart items Choose when the cart items should be cleared.
On order creation: Once the order is created, the items in cart would be cleared.
On confirmation: Only when the order is confirmed by the payment gateway, the cart items would be cleared.
Default payment method The method chosen here would be the one that is selected by default at the checkout.
Prevent customer from checking out if shipping method was not chosen
Auto apply if only one shipping method is available Setting this option to yes would apply the shipping method if only one shipping method is available for the address and product chosen by the user.
Hide shipping costs until an address is entered Setting this option to Yes would hide the shipping costs until the user chooses the address at the checkout.
Clear Cart data Older than The duration mentioned here would determine the number of days the cart is left uncleared. Options available or 1 week, 2 weeks,1 month, 2 months, 3 months.

Checkout Layout
The layout of the checkout address fields.** NOTE:** Removing a field here will NOT remove it actually. Go to Setup -> Custom Fields to enable or disable the fields. This tab just decides the display and ordering of the fields in the checkout steps.
Checkout Billing Address Layout This option helps to include/exclude the required fields in the layout of Billing Address. For e.g., [first_name][last_name][phone_1][phone_2][company] [tax_number][address_1] [address_2] [city] [zip] [country_id][zone_id]Like this any html code can be added here for one’s desired layout.
Checkout Shipping Address Layout This option helps to include/exclude the required fields in the layout of Shipping Address.
Checkout Payment Method Layout This option is to decide which fields are required in the layout for the Payment Method while checking out.
Pre-populate / Restore This is a button, that restores the default setting of all the three options given above, when clicked.

Example to add a custom field Assume that it would be better to add a Title field before the First Name. To achieve that, create a custom field with title as its name, as shown in the image:
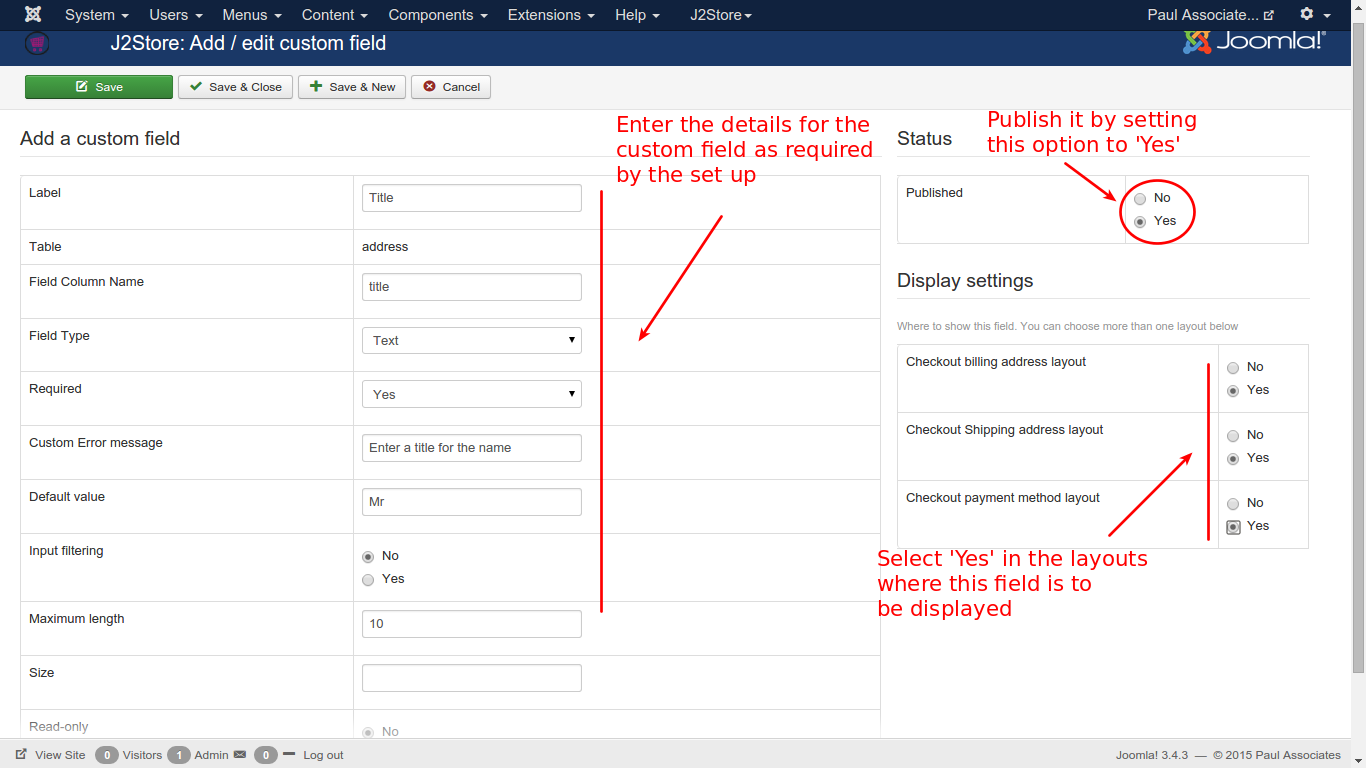
Now, in the checkout process, the added custom field Title will be displayed before the First Name field, as illustrated in the following image:
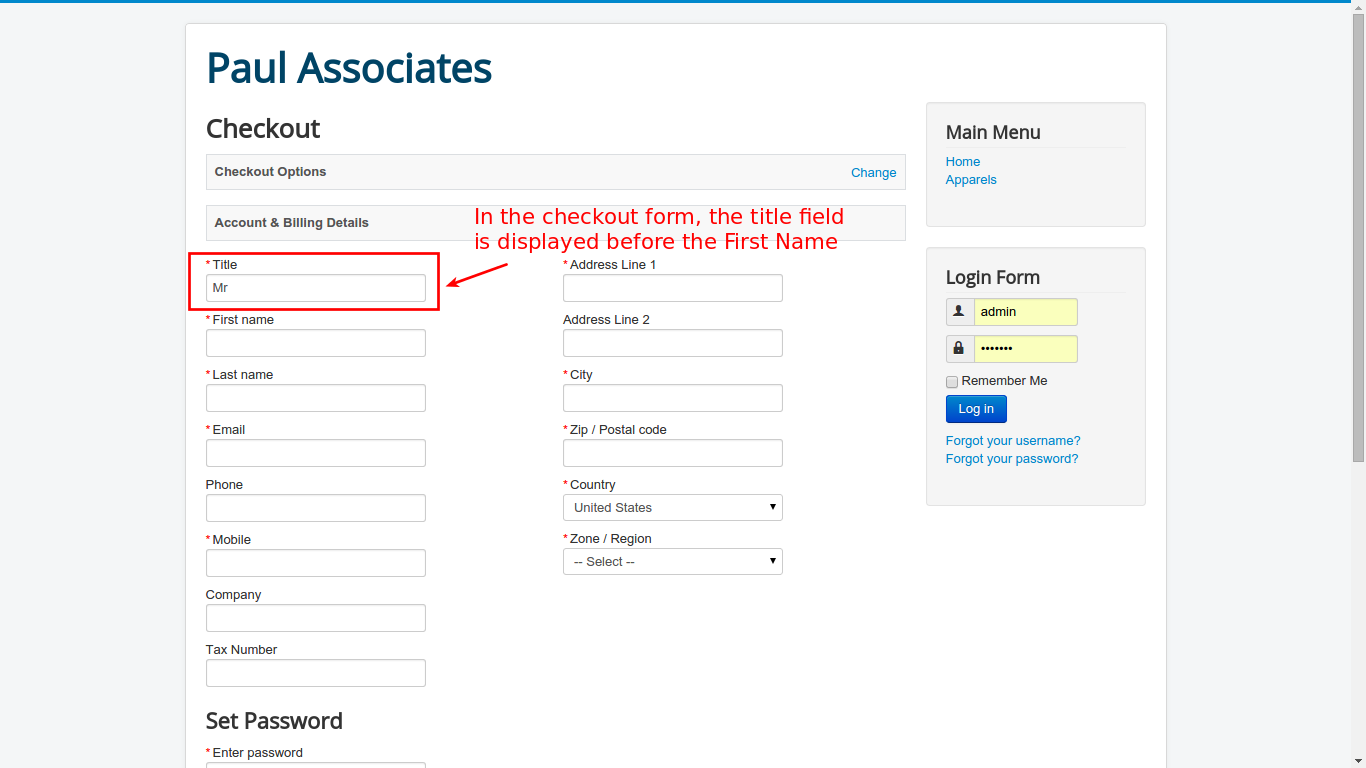
In this way, new custom fields can be added according to the needs of the user.
Order
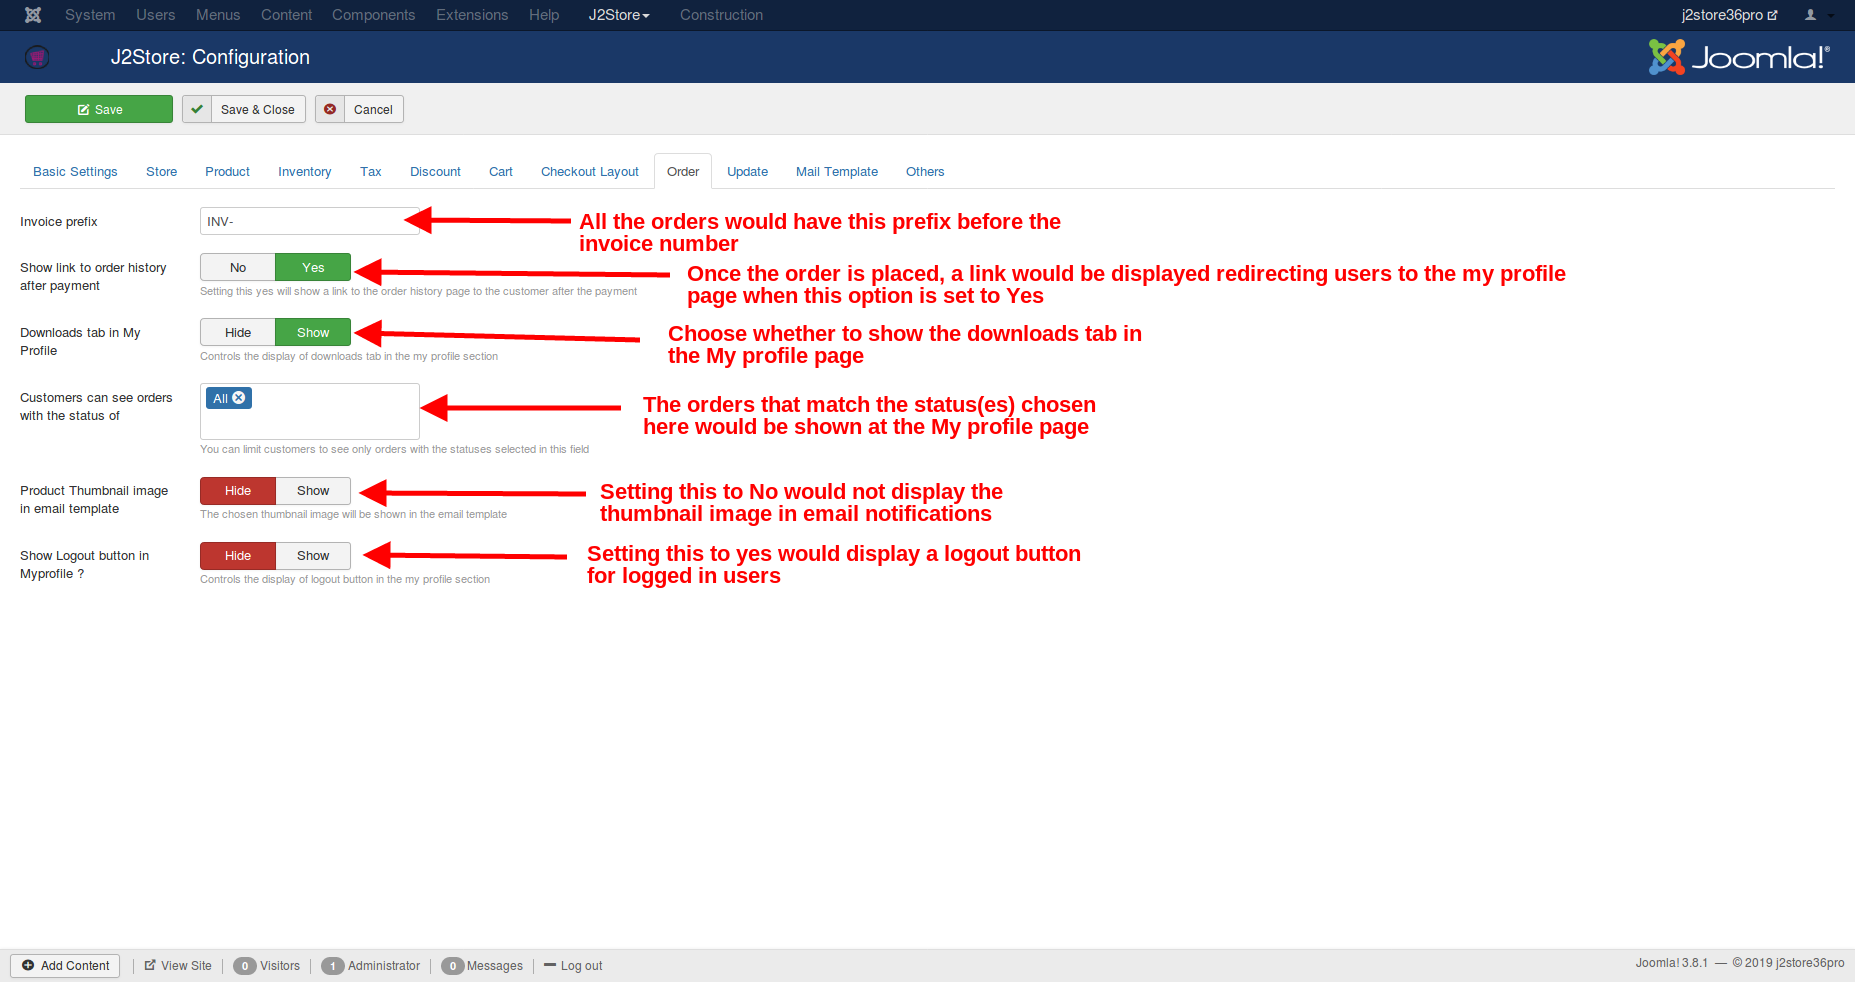
Invoice Prefix This is the prefix of the Invoice generated when payment is done.
For e.g., the system generates only numbers and if one wants to add some prefix to the invoice number to add information about the invoice, it can be done by setting this field with the prefix. Let’s assume a company with a name RB Corporation, sells some products and the invoice prefix can be anything customized by the owner of the company. Some of the possibilities are:RBC/S/000RBC-2015-S-000
In the above example, RBC/S/000, RBC is the initials of the company, S can be added for sales classification, 000 for number prefix.
Likewise, in RBC-2015-S-000, all are same and the extra 2015 may be added for the sales for the year 2015.
Now the system generated invoice number, say 1, will be appended with this prefix, and will be displayed as RBC/S/0001 in the invoice.
Show Link to Order History after payment Enabling this will show the user a link which will take to the user’s order history page. This will be done only after payment.
Downloads tab in My Profile Set this to SHOW will display the download tab in the myprofile section.
Customers can see orders with the status of All, Confirmed, Processed, Failed, Pending, New, Cancelled.
Product Thumbnail image in email template Set this to SHOW will display the product thumbnail image in email template.
Show Logout button in Myprofile This option is used to show / hide logout button in myprofile.
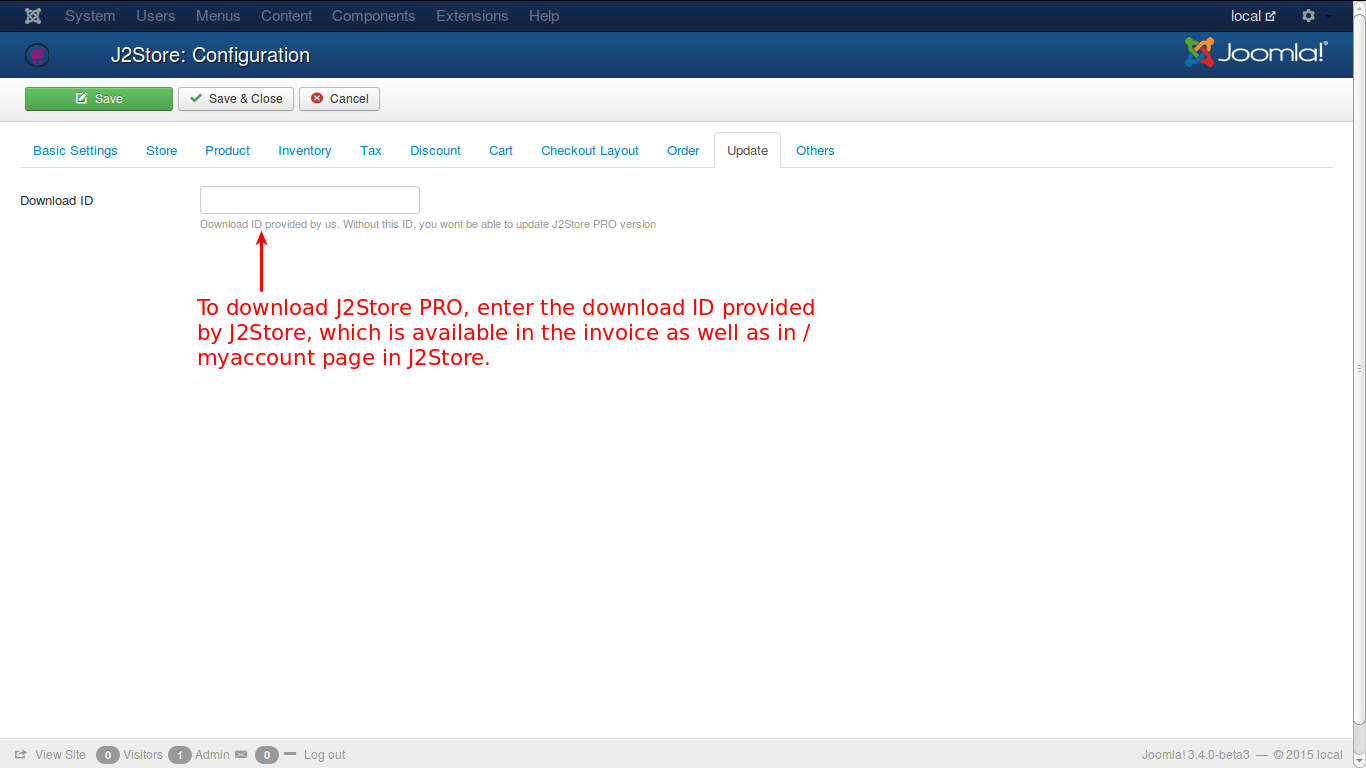
Update
Applies only for J2Store PRO users
This tab has a text input to enter the Download ID provided by J2Store , which is a requirement for updating the j2store component’s PRO version. Without this ID, j2store PRO cannot be downloaded. This ID will be available in the Invoice as well as in My Download of j2store.org
Mail Template
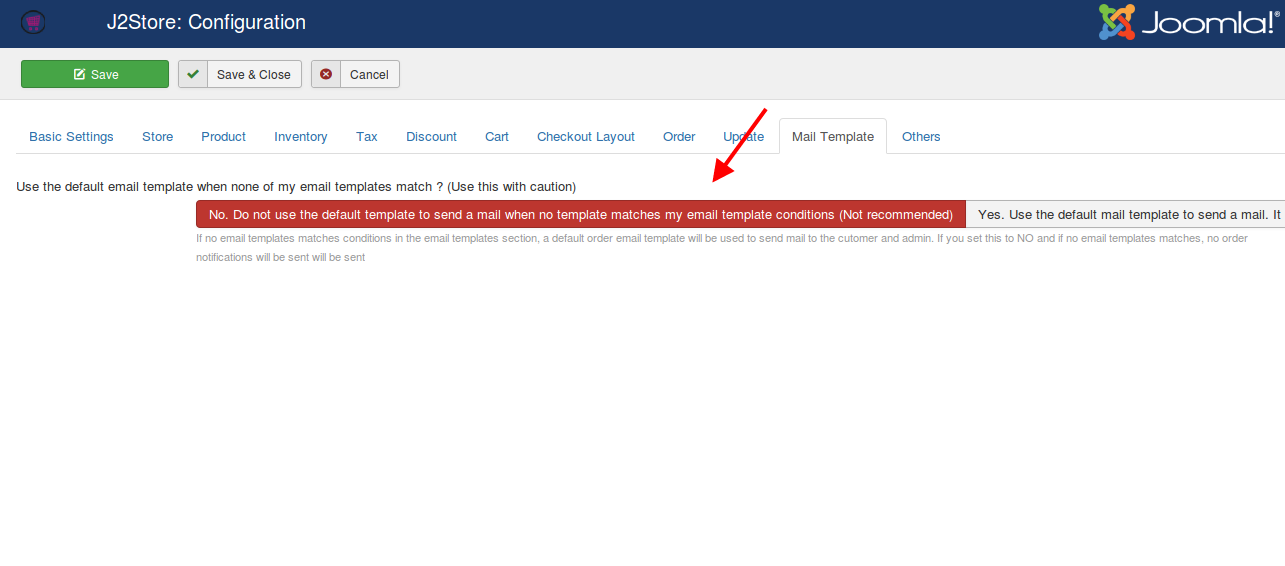
This tab has a option to avoid sending default email template to customers and admin. In somecases, you will be like to send email template only to customers or vice versa. In this case, if there is no email template assigned to admin or to customer, the system will send a default email template.
To avoid this, please choose No. Do not use the default template to send a mail when no template matches my email template conditions (Not recommended)
Others
Misc. options for the store
Show Terms and Conditions during Checkout If this option is set with a Yes, a checkbox with a link to the article that contains the Terms and Coditions will be shown.
Terms and Conditions Display Type This is to decide how the Terms and Conditions link is to be displayed. By default, it will be a Link but if it is desired to be a check box, it is possible by selecting Checkbox.
Article ID of the Terms and Conditions The ID of the article that holds the Terms and conditions is to be given here.
Prepare content for Terms and Conditions and Thank you article? Set this YES will parse the article content
Enable falang support This option provides support for SEF URLs used in Falang translation component. Enable if you have installed Falang. Check the image below for a better idea.

Last updated