
Elavon Coverage/Virtual Merchant Payment Plugin
Introduction
This plugin integrates J2Store with Virtual Merchant payment gateway, thus facilitating users who prefer Virtual Merchant to pay online.
Requirements
PHP 5.2 or higher
Joomla 2.5 or above
J2Store 2.7.3 or above
Installation
Use Joomla installer to install the plugin.
At the backend, joomla control panel, go to Extension -> Plugin Manager and open the Virtual Merchant (type = j2store).
Enable the plugin.
Enter the plugin parameters.
Parameters
You can configure the payment plugin with the help of the images below:
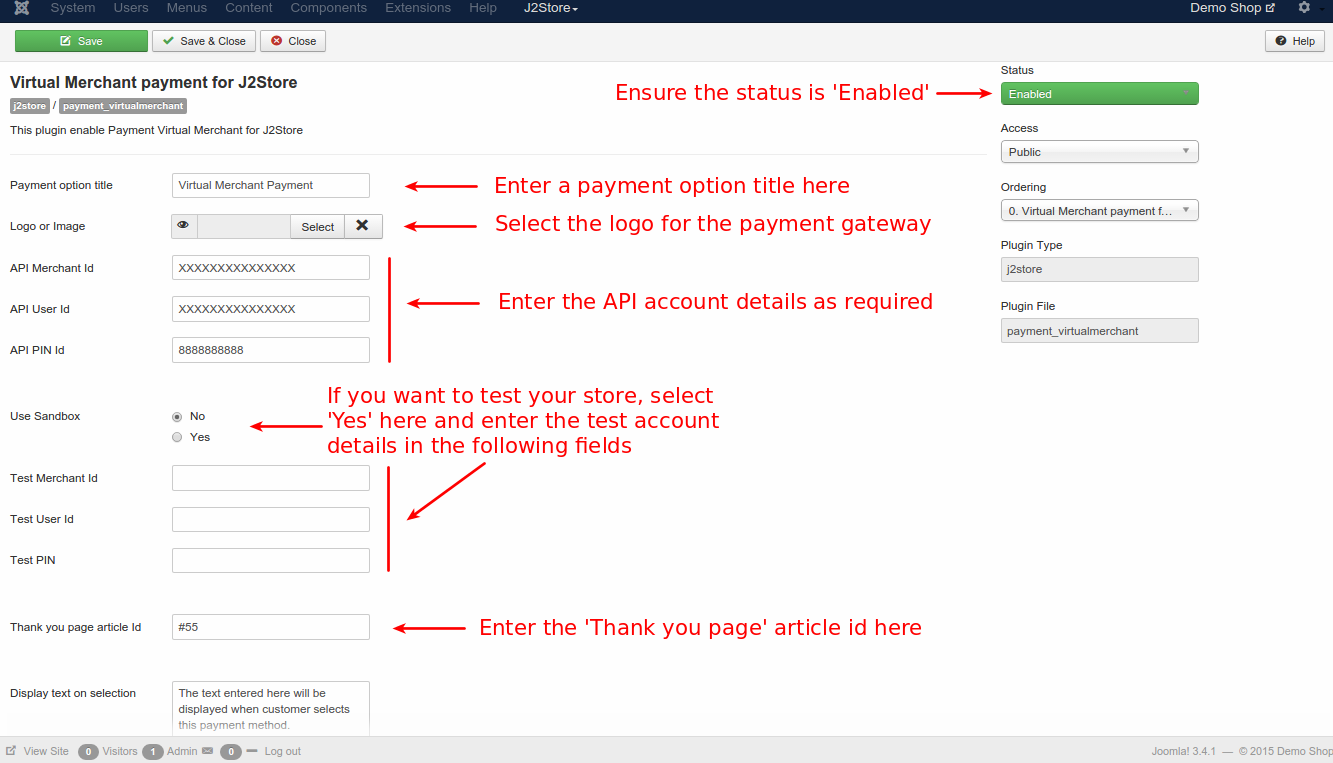
Payment Option Title -Enter Option Title here. This text will be displayed while listing the payment option.
Logo or Image -This option is used to display the payment plugin logo in the checkout page.
API Merchant ID -Here, you have to enter the API Merchant ID associated with Virtual Merchant account.
API User ID -Here, you have to enter the API User ID associated with Virtual Merchant account.
API PIN -Here, you have to enter the API PIN associated with Virtual Merchant account.
Use Sandbox -This is for testing purposes. Before going live, you can test your store using sandbox mode.There are two options allowed here.Yes - Set in demo accounts for testing purposesNo - Set in live accounts
Note - In live site, this should always be set to NO
Test Merchant ID -Here, you need to enter the Test Merchant ID, that is associated with Virtual Merchant demo account.
Test User ID -Here, you need to enter the Test User id, that is associated with Virtual Merchant demo account.
Test Merchant ID -Here, you need to enter the Test PIN id, that is associated with Virtual Merchant demo account.
Thankyou Page Article ID -If you want to display thankyou message, you need to enter the article id here. The message will be displayed after payment completion page.
Display Text on Selection -The text entered here is displayed when a customer selects this payment method. You can enter a language constant as a value here, if you are using a multi-lingual site and then write a language override. Refer the tips below:
Tip -ONLY FOR MULTI-LINGUAL SITES -For example, enter a language constant :J2STORETEXTTODISPLAYON_SELECTION.Now you can go to Joomla admin -> Language Manager -> Overrides and create overrides for the language constant in all languages.
Display text before payment -The text entered here is displayed to the customer at the order summary screen, before the customer makes the payment.You can enter language constant as a value here, if you are using a multi-lingual site and then write a language override. Refer the Display text on selection param.
Display text on after payment -The text entered here will be displayed to the customer after he makes the payment. You can enter a language constant as a value here if you are using a multi-lingual site and then write a language override. Refer the Display text on selection param.
Display text on error in payment -The text entered here is displayed to the customer when there is an error in the payment process.You can enter a language constant as a value here if you are using a multi-lingual site and then write a language override. Refer the Display text on selection param.
Display text if customers cancels payment -The text entered here will be displayed to the customer when he cancels the payment at the gateway (NOT in your site).You can enter a language constant as a value here if you are using a multi-lingual site and then write a language override. Refer the Display text on selection param.
Payment button text -The text of the payment button. The button will be displayed at the final checkout step.
Debug -This option is used to enable/disable log file.
Support Still have questions? You can reach us in [email protected]
Thankyou for using our extension.
Last updated